Who is an Analytics Engineer?
- Traditional Data Teams
- ETL vs ELT
- Analytics Engineer
- Data Build Tool
The typically have 2 roles. Data Analysts - Work closely with the business decision makers in finance, marketing and other departments. They query the data to serve it up using dashboards or different types of reports.
Skill set: Dashboards, Reporting, Excel, SQL
Data Engineers - In charge of building the infrastructure that the data is hosted on usually database and also for managing ETL process.
Skill set: ETL, Orchestration, SQL, Python, Java etc
What is an ETL process? ETL refers to the process of Extracting Manipulating/Transforming & Loading data.
Data Warehouses combine a database and a supercomputer for transforming data. Data can now be transformed directly in the database. There's no need to extract and load repeatedly.
This resulted in ELT processes i.e Extract Load Transform. This means that the Data Team can focus on first extracting some data from a source and then loading it into their warehouse. The data can then be transformed.

- Data Engineer
- Analytics Engineer
- Data Analysts
The emergence of EL(Extract, Load) tools has made the process of extracting data from various data sources and then load them into your data platform a lot easier.
- Data Sources -> Loaders -> Data Platforms(DBT - Manages data transformations, runs tests) -> Usages

- Data transfers are handled using loaders(EL tools) or custom tooling written in different technologies.
- The data is then consumed using tools such as BI tools, for Machine Learning etc.
- DBT WORKS directly with the data platform to manage transformations, test them and also document them.
- BI Tools
- ML Model
- Operational Analytics
-
DBT makes it easier to develop transformation pipelines since it allows the user to write modular code in models as SQL select statements.
-
You don't have to worry about the DDL - Data Design Language and DML - Data Manipulation Language
After you're satisfied with your transformations, you can deploy your DBT project on a schedule via the DBT Cloud interface, setup a job that can run weekly, daily, hourly and so on.
Then you'll have refreshed datasets on whatever cadence that you need.
Data engineers are responsible for maintaining data infrastructure and the ETL process for creating tables and views. Data analysts focus on querying tables and views to drive business insights for stakeholders.
- ETL (extract transform load) is the process of creating new database objects by extracting data from multiple data sources, transforming it on a local or third party machine, and loading the transformed data into a data warehouse.
- ELT (extract load transform) is a more recent process of creating new database objects by first extracting and loading raw data into a data warehouse and then transforming that data directly in the warehouse.
- The new ELT process is made possible by the introduction of cloud-based data warehouse technologies.
Analytics engineers focus on the transformation of raw data into transformed data that is ready for analysis. This new role on the data team changes the responsibilities of data engineers and data analysts.
Data engineers can focus on larger data architecture and the EL in ELT. Data analysts can focus on insight and dashboard work using the transformed data.
Note: At a small company, a data team of one may own all three of these roles and responsibilities. As your team grows, the lines between these roles will remain blurry. dbt
- dbt empowers data teams to leverage software engineering principles for transforming data.
Q. What technological changes have contributed to the evolution of Extract-Transform-Load (ETL) to Extract-Load-Transform (ELT)?
A.
- Modern cloud-based data warehouses with scalable storage and compute
- Off-the-shelf data pipeline/extraction tools (ex: Stitch, Fivetran)
- Self-service business intelligence tools increased the ability for stakeholders to access and analyze data
Q. dbt is part of which step of the Extract-Load-Transform (ELT) process?
A.
- Transform
Q. Which one of the following is true about dbt in the context of the modern data stack?
A. dbt connects directly to your data platform to model data
**Q.**Which one of the following is true about YAML files in dbt?
YAML files are used for configuring generic tests
There are 2 ways to connect dbt Cloud to Databricks.
- Patner Connect - Provides a streamlined setup to create your dbt Cloud account from within your Databricks account.
- Creating a dbt Cloud account seperately and build the Databricks connection yourself(manually).
NB - Patner Connect is the easiest way to get set up.
Now that you have a repository configured, you can initialize your project and start development in dbt Cloud:
Click Start developing in the IDE. It might take a few minutes for your project to spin up for the first time as it establishes your git connection, clones your repo, and tests the connection to the warehouse.
Above the file tree to the left, click Initialize dbt project. This builds out your folder structure with example models.
Make your initial commit by clicking Commit and sync. Use the commit message initial commit and click Commit. This creates the first commit to your managed repo and allows you to open a branch where you can add new dbt code.
You can now directly query data from your warehouse and execute dbt run. You can try this out now:
Click + Create new file, add this query to the new file, and click Save as to save the new file:
select * from default.jaffle_shop_customersIn the command line bar at the bottom, enter dbt run and click Enter. You should see a dbt run succeeded message.
Build your first model
- Under Version Control on the left, click Create branch. You can name it
add-customers-model. You need to create a new branch since the main branch is set to read-only mode. - Click the ... next to the
modelsdirectory, then select Create file. - Name the file
customers.sql, then click Create. - Copy the following query into the file and click Save.
with customers as (

    select
        id as customer_id,
        first_name,
        last_name

    from jaffle_shop_customers

),

orders as (

    select
        id as order_id,
        user_id as customer_id,
        order_date,
        status

    from jaffle_shop_orders

),

customer_orders as (

    select
        customer_id,

        min(order_date) as first_order_date,
        max(order_date) as most_recent_order_date,
        count(order_id) as number_of_orders

    from orders

    group by 1

),

final as (

    select
        customers.customer_id,
        customers.first_name,
        customers.last_name,
        customer_orders.first_order_date,
        customer_orders.most_recent_order_date,
        coalesce(customer_orders.number_of_orders, 0) as number_of_orders

    from customers

    left join customer_orders using (customer_id)

)

select * from final- Enter
dbt runin the command prompt at the bottom of the screen. You should get a successful run and see the three models. Later, you can connect your business intelligence (BI) tools to these views and tables so they only read cleaned up data rather than raw data in your BI tool.
One of the most powerful features of dbt is that you can change the way a model is materialized in your warehouse, simply by changing a configuration value. You can change things between tables and views by changing a keyword rather than writing the data definition language (DDL) to do this behind the scenes. ` By default, everything gets created as a view. You can override that at the directory level so everything in that directory will materialize to a different materialization.
-
Edit your
dbt_project.ymlfile.- Update your project
nameto:
dbt_project.yml
name: 'jaffle_shop'
- Update your project
- Configure
jaffle_shopso everything in it will be materialized as a table; and configureexampleso everything in it will be materialized as a view. Update yourmodelsconfig block to: dbt_project.yml
```yaml
    models:  jaffle_shop:    +materialized: table    example:      +materialized: view
```
Click Save.
-
Enter the
dbt runcommand. Yourcustomersmodel should now be built as a table! INFOTo do this, dbt had to first run a
drop viewstatement (or API call on BigQuery), then acreate table asstatement. -
Edit
models/customers.sqlto override thedbt_project.ymlfor thecustomersmodel only by adding the following snippet to the top, and click Save: models/customers.sql{{ config( materialized='view' )}}with customers as ( select id as customer_id...) -
Enter the
dbt runcommand. Your model,customersshould now build as a view. -
Enter the
dbt run --full-refreshcommand for this to take effect in your warehouse.
dbt run
dbt run --full-refresh
-
In dbt, tables store the data itself as opposed to views which store the query logic. Currently, dbt supports four types of materializations: table, view, incremental, and ephemeral.
-
The table and incremental materializations persist a table, the view materialization creates a view, and the ephemeral materialization returns results directly using a common table expression (CTE).
-
If you use dbt, there's little need for materialized views since a materialized view is a table based on a query, and you can materialize a dbt model as a table to get the same result.
Note - Optionally set a resource to always or never full-refresh. 1. If specified as true or false, thefull_refresh config will take precedence over the presence or absence of the --full-refreshflag. 2. If the full_refresh config is none or omitted, the resource will use the value of the --full-refreshflag.
dbt run full refresh is a command that treats incremental models as table models.
This means that dbt will drop and recreate the models instead of appending new data to them.
- This is useful when the schema or the logic of the incremental models changes and you need to reprocess the entire data. The
--full-refreshflag affects theis_incremental()macro, which will returnfalsefor all models when the flag is specified.
You can now delete the files that dbt created when you initialized the project:
-
Delete the
models/example/directory. -
Delete the
example:key from yourdbt_project.ymlfile, and any configurations that are listed under it.dbt_project.yml
# beforemodels:
    jaffle_shop:
        +materialized: table
    example:
        +materialized: view
dbt_project.yml
# aftermodels:
    jaffle_shop:
        +materialized: table
-
Save your changes.
As a best practice in SQL, you should separate logic that cleans up your data from logic that transforms your data. You have already started doing this in the existing query by using common table expressions (CTEs).
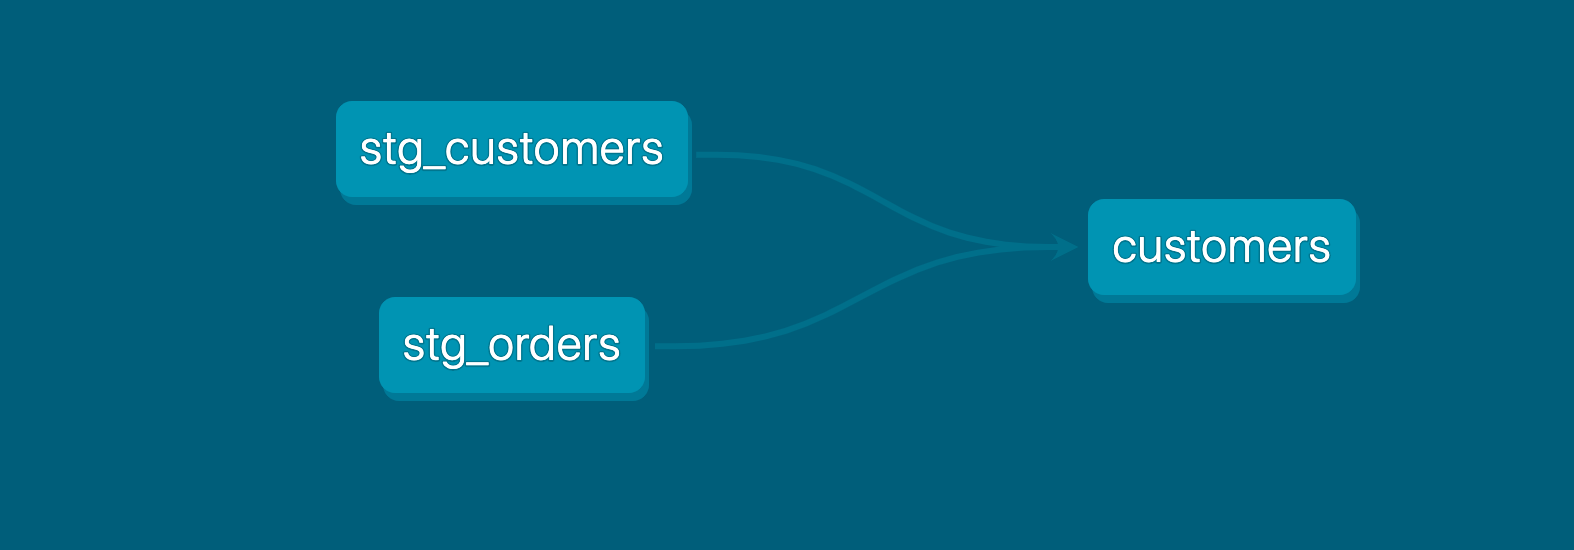
Now you can experiment by separating the logic out into separate models and using the ref function to build models on top of other models:
-
Create a new SQL file,
models/stg_customers.sql, with the SQL from thecustomersCTE in our original query. -
Create a second new SQL file,
models/stg_orders.sql, with the SQL from theordersCTE in our original query.models/stg_customers.sql
select    id as customer_id,    first_name,    last_name
from jaffle_shop_customers
models/stg_orders.sql
select    id as order_id,    user_id as customer_id,    order_date,
status
from jaffle_shop_orders
3. Edit the SQL in your models/customers.sql file as follows:
models/customers.sql
  with customers as (
 select
   *
 from
   {{ ref('stg_customers') }}
),
orders as (
 select
   *
 from
   {{ ref('stg_orders') }}
),
customer_orders as (
 select
   customer_id,
   min(order_date) as first_order_date,
   max(order_date) as most_recent_order_date,
   count(order_id) as number_of_orders
 from
   orders
 group by
   1
),
final as (
 select
   customers.customer_id,
   customers.first_name,
   customers.last_name,
   customer_orders.first_order_date,
   customer_orders.most_recent_order_date,
   coalesce(
     customer_orders.number_of_orders,
     0
   ) as number_of_orders
 from
   customers
   left join customer_orders using (customer_id)
)
select
 *
from
 final
4. Execute dbt run.
This time, when you performed a dbt run, separate views/tables were created for stg_customers, stg_orders and customers. dbt inferred the order to run these models. Because customers depends on stg_customers and stg_orders, dbt builds customers last. You do not need to explicitly define these dependencies.
Add tests to your models
Adding tests to a project helps validate that your models are working correctly.
To add tests to your project:
-
Create a new YAML file in the
modelsdirectory, namedmodels/schema.yml -
Add the following contents to the file:
models/schema.yml
version: 2

models:
  - name: customers
    columns:
      - name: customer_id
        tests:
          - unique
          - not_null

  - name: stg_customers
    columns:
      - name: customer_id
        tests:
          - unique
          - not_null

  - name: stg_orders
    columns:
      - name: order_id
        tests:
          - unique
          - not_null
      - name: status
        tests:
          - accepted_values:
              values: ['placed', 'shipped', 'completed', 'return_pending', 'returned']
      - name: customer_id
        tests:
          - not_null
          - relationships:
              to: ref('stg_customers')
field: customer_id- Run
dbt test, and confirm that all your tests passed.
When you run dbt test, dbt iterates through your YAML files, and constructs a query for each test. Each query will return the number of records that fail the test. If this number is 0, then the test is successful.
Adding documentation to your project allows you to describe your models in rich detail, and share that information with your team. Here, we're going to add some basic documentation to our project.
- Update your models/schema.yml file to include some descriptions, such as those below.
version: 2

models:
  - name: customers
    description: One record per customer
    columns:
      - name: customer_id
        description: Primary key
        tests:
          - unique
          - not_null
      - name: first_order_date
        description: NULL when a customer has not yet placed an order.

  - name: stg_customers
    description: This model cleans up customer data
    columns:
      - name: customer_id
        description: Primary key
        tests:
          - unique
          - not_null

  - name: stg_orders
    description: This model cleans up order data
    columns:
      - name: order_id
        description: Primary key
        tests:
          - unique
          - not_null
      - name: status
        tests:
          - accepted_values:
              values: ['placed', 'shipped', 'completed', 'return_pending', 'returned']
      - name: customer_id
        tests:
          - not_null
          - relationships:
              to: ref('stg_customers')
field: customer_id-
Run dbt docs generate to generate the documentation for your project. dbt introspects your project and your warehouse to generate a JSON file with rich documentation about your project.
-
Click the book icon in the Develop interface to launch documentation in a new tab.
Now that you've built your customer model, you need to commit the changes you made to the project so that the repository has your latest code.
Under Version Control on the left, click Commit and sync and add a message. For example, "Add customers model, tests, docs." Click Merge this branch to main to add these changes to the main branch on your repo.
Deploy dbt
Use dbt Cloud's Scheduler to deploy your production jobs confidently and build *observability *into your processes. You'll learn to create a deployment environment and run a job in the following steps.
Create a deployment environment
- In the upper left, select Deploy, then click Environments.
- Click Create Environment.
- In the Name field, write the name of your deployment environment. For example, "Production."
- In the dbt Version field, select the latest version from the dropdown.
- Under Deployment Credentials, enter the name of the dataset you want to use as the target, such as "Analytics". This will allow dbt to build and work with that dataset. For some data warehouses, the target dataset may be referred to as a "schema".
- Click Save.
Create and run a job
Jobs are a set of dbt commands that you want to run on a schedule. For example, dbt build.
As the jaffle_shop business gains more customers, and those customers create more orders, you will see more records added to your source data. Because you materialized the customers model as a table, you'll need to periodically rebuild your table to ensure that the data stays up-to-date. This update will happen when you run a job.
- After creating your deployment environment, you should be directed to the page for a new environment. If not, select Deploy in the upper left, then click Jobs.
- Click Create one and provide a name, for example, "Production run", and link to the Environment you just created.
- Scroll down to the Execution Settings section.
- Under Commands, add this command as part of your job if you don't see it:
dbt build
- Select the Generate docs on run checkbox to automatically generate updated project docs each time your job runs.
- For this exercise, do not set a schedule for your project to run — while your organization's project should run regularly, there's no need to run this example project on a schedule. Scheduling a job is sometimes referred to as deploying a project.
- Select Save, then click Run now to run your job.
- Click the run and watch its progress under "Run history."
- Once the run is complete, click View Documentation to see the docs for your project.
The dbt Cloud integrated development environment (IDE) is a single interface for building, testing, running, and version-controlling dbt projects from your browser. With the Cloud IDE, you can compile dbt code into SQL and run it against your database directly

Basic layout
The IDE streamlines your workflow, and features a popular user interface layout with files and folders on the left, editor on the right, and command and console information at the bottom.

1. Git repository link — Clicking the Git repository link, located on the upper left of the IDE, takes you to your repository on the same active branch.
2. Documentation site button — Clicking the Documentation site book icon, located next to the Git repository link, leads to the dbt Documentation site. The site is powered by the latest dbt artifacts generated in the IDE using the dbt docs generate command from the Command bar.
3. Version Control — The IDE's powerful Version Control section contains all git-related elements, including the Git actions button and the Changes section.
4. File Explorer — The File Explorer shows the filetree of your repository. You can:
- Click on any file in the filetree to open the file in the File Editor.
- Click and drag files between directories to move files.
- Right click a file to access the sub-menu options like duplicate file, copy file name, copy as ref, rename, delete.
- Note: To perform these actions, the user must not be in read-only mode, which generally happens when the user is viewing the default branch.
- Use file indicators, located to the right of your files or folder name, to see when changes or actions were made:
- Unsaved (•) — The IDE detects unsaved changes to your file/folder
- Modification (M) — The IDE detects a modification of existing files/folders
- Added (A) — The IDE detects added files
- Deleted (D) — The IDE detects deleted files

5.Command bar — The Command bar, located in the lower left of the IDE, is used to invoke dbt commands. When a command is invoked, the associated logs are shown in the Invocation History Drawer.
6. IDE Status button — The IDE Status button, located on the lower right of the IDE, displays the current IDE status. If there is an error in the status or in the dbt code that stops the project from parsing, the button will turn red and display "Error". If there aren't any errors, the button will display a green "Ready" status. To access the IDE Status modal, simply click on this button.
- Models are .sql files that live in the models folder.
- Models are simply written as select statements - there is no DDL/DML that needs to be written around this. This allows the developer to focus on the logic.
- In the Cloud IDE, the Preview button will run this select statement against your data warehouse. The results shown here are equivalent to what this model will return once it is materialized.
- After constructing a model,
dbt runin the command line will actually materialize the models into the data warehouse. The default materialization is a view. - The materialization can be configured as a table with the following configuration block at the top of the model file:
{{ config(
materialized='table'
) }}
- The same applies for configuring a model as a view:
{{ config(
materialized='view'
) }}
-
When
dbt runis executing, dbt is wrapping the select statement in the correct DDL/DML to build that model as a table/view. If that model already exists in the data warehouse, dbt will automatically drop that table or view before building the new database object. *Note: If you are on BigQuery, you may need to rundbt run --full-refreshfor this to take effect. -
The DDL/DML that is being run to build each model can be viewed in the logs through the cloud interface or the target folder.

- We could build each of our final models in a single model as we did with dim_customers, however with dbt we can create our final data products using modularity.
- Modularity is the degree to which a system's components may be separated and recombined, often with the benefit of flexibility and variety in use.
- This allows us to build data artifacts in logical steps.
- For example, we can stage the raw customers and orders data to shape it into what we want it to look like. Then we can build a model that references both of these to build the final dim_customers model.
- Thinking modularly is how software engineers build applications. Models can be leveraged to apply this modular thinking to analytics engineering.
- Models can be written to reference the underlying tables and views that were building the data warehouse (e.g.
analytics.dbt_jsmith.stg_customers). This hard codes the table names and makes it difficult to share code between developers. - The
reffunction allows us to build dependencies between models in a flexible way that can be shared in a common code base. Thereffunction compiles to the name of the database object as it has been created on the most recent execution ofdbt runin the particular development environment. This is determined by the environment configuration that was set up when the project was created. - Example:
{{ ref('stg_customers') }}compiles toanalytics.dbt_jsmith.stg_customers. - The
reffunction also builds a lineage graph like the one shown below. dbt is able to determine dependencies between models and takes those into account to build models in the correct order.

- There have been multiple modeling paradigms since the advent of database technology. Many of these are classified as normalized modeling.
- Normalized modeling techniques were designed when storage was expensive and computational power was not as affordable as it is today.
- With a modern cloud-based data warehouse, we can approach analytics differently in an agile or ad hoc modeling technique. This is often referred to as denormalized modeling.
- dbt can build your data warehouse into any of these schemas. dbt is a tool for how to build these rather than enforcing what to build.
In working on this project, we established some conventions for naming our models.
- Sources (
src) refer to the raw table data that have been built in the warehouse through a loading process. (We will cover configuring Sources in the Sources module) - Staging (
stg) refers to models that are built directly on top of sources. These have a one-to-one relationship with sources tables. These are used for very light transformations that shape the data into what you want it to be. These models are used to clean and standardize the data before transforming data downstream. Note: These are typically materialized as views. - Intermediate (
int) refers to any models that exist between final fact and dimension tables. These should be built on staging models rather than directly on sources to leverage the data cleaning that was done in staging. - Fact (
fct) refers to any data that represents something that occurred or is occurring. Examples include sessions, transactions, orders, stories, votes. These are typically skinny, long tables. - Dimension (
dim) refers to data that represents a person, place or thing. Examples include customers, products, candidates, buildings, employees. - Note: The Fact and Dimension convention is based on previous normalized modeling techniques.
- When
dbt runis executed, dbt will automatically run every model in the models directory. - The subfolder structure within the models directory can be leveraged for organizing the project as the data team sees fit.
- This can then be leveraged to select certain folders with
dbt runand the model selector. - Example: If
dbt run -s stagingwill run all models that exist inmodels/staging. (Note: This can also be applied fordbt testas well which will be covered later.) - The following framework can be a starting part for designing your own model organization:
- Marts folder: All intermediate, fact, and dimension models can be stored here. Further subfolders can be used to separate data by business function (e.g. marketing, finance)
- Staging folder: All staging models and source configurations can be stored here. Further subfolders can be used to separate data by data source (e.g. Stripe, Segment, Salesforce). (We will cover configuring Sources in the Sources module)

Q1. In the dbt context, what is a model?
- A. A select statement written in SQL
Q2. What file type is used for building a model?
- A. .sql
Q3. What is the default materialization of a model if you don't proactively configure the materialization for a model?
- A. View
Q4. A given model called events is configured to be materialized as a view in dbt_project.yml and configured as a table in a config block at the top of the model. When you execute dbt run, what will happen in dbt?
- A. dbt will build the
eventsmodel as a table
Q5. How do you build dependencies between models?
- A. Use the 'ref' function in the from clause of a model
Q6. Which one of the following is true about staging models as defined in this course?
- A. Staging models are used to perform light touch transformations to shape the data to how you wish it looked
Q7. Which of the following is a benefit of using subdirectories in your models directory?
- A. Subdirectories allow you to configure materializations at the folder level for a collection of models
Q8. Which command below will attempt to only materialize dim_customers and its downstream models?
- A. dbt run --select dim_customers+
Using the resources in this module, complete the following in your dbt project.
- Configure a source for the tables
raw.jaffle_shop.customersandraw.jaffle_shop.ordersin a file calledsrc_jaffle_shop.yml.
models/staging/jaffle_shop/src_jaffle_shop.yml
version: 2

sources:
  - name: jaffle_shop
    database: raw
    schema: jaffle_shop
    tables:
      - name: customers
      - name: orders
- Extra credit: Configure a source for the table
raw.stripe.paymentin a file calledsrc_stripe.yml.
- Refactor
stg_customers.sqlusing the source function.
models/staging/jaffle_shop/stg_customers.sql
select
    id as customer_id,
    first_name,
    last_name
from {{ source('jaffle_shop', 'customers') }}
- Refactor
stg_orders.sqlusing the source function.
models/staging/jaffle_shop/stg_orders.sql
select
    id as order_id,
    user_id as customer_id,
    order_date,
    status
from {{ source('jaffle_shop', 'orders') }}
- Extra credit: Refactor
stg_payments.sqlusing the source function.
- Configure your Stripe payments data to check for source freshness.
- Run
dbt source freshness.
You can configure your sources.yml file as below:
version: 2

sources:
  - name: my_table_name
    database: my_database_name
    schema: my_schema_name
    tables:
      - name: my_table_name
      - ...
        loaded_at_field: _etl_loaded_at
        freshness:
          warn_after:
            count: 12
            period: hour
          error_after:
            count: 24
            period: hour
- Sources represent the raw data that is loaded into the data warehouse.
- We can reference tables in our models with an explicit table name (
raw.jaffle_shop.customers). - However, setting up Sources in dbt and referring to them with the
sourcefunction enables a few important tools.- Multiple tables from a single source can be configured in one place.
- Sources are easily identified as green nodes in the Lineage Graph.
- You can use
dbt source freshnessto check the freshness of raw tables.
- Sources are configured in YML files in the models directory.
- The following code block configures the table
raw.jaffle_shop.customersandraw.jaffle_shop.orders:
version: 2

sources:
  - name: jaffle_shop
    database: raw
    schema: jaffle_shop
    tables:
      - name: customers
      - name: orders
- View the full documentation for configuring sources on the source properties page of the docs.
- The
reffunction is used to build dependencies between models. - Similarly, the
sourcefunction is used to build the dependency of one model to a source. - Given the source configuration above, the snippet
{{ source('jaffle_shop','customers') }}in a model file will compile toraw.jaffle_shop.customers. - The Lineage Graph will represent the sources in green.

- Freshness thresholds can be set in the YML file where sources are configured. For each table, the keys
loaded_at_fieldandfreshnessmust be configured.
version: 2

sources:
  - name: jaffle_shop
    database: raw
    schema: jaffle_shop
    tables:
      - name: orders
        loaded_at_field: _etl_loaded_at
        freshness:
          warn_after: {count: 12, period: hour}
          error_after: {count: 24, period: hour}
- A threshold can be configured for giving a warning and an error with the keys
warn_afteranderror_after. - The freshness of sources can then be determined with the command
dbt source freshness.
Q. By default, where in your dbt project will dbt look for source configurations? A. A .yml file in the models folder
Q. Which of the following is NOT a benefit of using the sources feature? A. You can modify and append to raw tables in your data warehouse
Q. Consider the YAML file below. Which of the following lines of code will select all columns from the products table?
models/staging/payments_sources.yml
version: 2

sources:
  - name: salesforce
    database: raw
    schema: sfdc
    tables:
      - name: customers
      - name: opportunities
      - name: products
  - name: quickbooks
    database: raw
    schema: qb
    tables:
      - name: payments
      - name: customers
A. select * from {{ source(‘salesforce’, ‘products’) }}
Q.

Consider the DAG of a dbt project listed above. What was most likely missed by the data team working on this project? A. They did not use the source function to build a dependency between staging models and sources
Q.
version: 2

sources:
  - name: jaffle_shop
    description: A clone of a Postgres application database
    database: raw
    schema: jaffle_shop
    tables:
      - name: customers
        description: Raw customers data.
        columns:
          - name: id
            description: Primary key for customers data.
            tests:
              - unique
              - not_null
      - name: orders
        description: Raw orders data.
        columns:
          - name: id
            description: Primary key for orders data.
            tests:
              - unique
              - not_null
        loaded_at_field: _etl_loaded_at
        freshness:
          warn_after: {count: 12, period: hour}
          error_after: {count: 24, period: hour}
Consider the YAML above. What does the freshness block accomplish? A. dbt will warn if the max(_etl_loaded_at) > 12 hours old, and error if max(_etl_loaded_at) > 24 hours old in the orders table when checking source freshness.
Q. What is the correct command to test your source freshness, assuming the freshness config block is correct? A. dbt source freshness
- Explain why testing is crucial for analytics.
- Explain the role of testing in analytics engineering.
- Configure and run generic tests in dbt.
- Write, configure, and run singular tests in dbt.
models/staging/jaffle_shop/stg_jaffle_shop.yml
Note how this is a .yml file rather than a .sql file
version: 2

models:
  - name: stg_customers
    columns:
      - name: customer_id
        tests:
          - unique
          - not_null

  - name: stg_orders
    columns:
      - name: order_id
        tests:
          - unique
          - not_null
      - name: status
        tests:
          - accepted_values:
              values:
                - completed
                - shipped
                - returned
                - return_pending
- placedQ. Will this work?
select
    order_id,
    sum(amount) as total_amount
from payments
-- Group by 1st column
group by 1
having total_amount < 0
A. We're using the table alias "payments" in our query, but we are encountering an error related to the column "total_amount" not existing.
The issue here is that we're using the alias "total_amount" in the HAVING clause, but it's not recognized because it's an alias for the result of the SUM(amount) expression,
and aliases defined in the SELECT clause cannot be used in the HAVING clause.
tests/assert_positive_total_for_payments.sql
Note how this is a .sql file in the tests directory
-- Refunds have a negative amount, so the total amount should always be >= 0. -- Therefore return records where this isn't true to make the test fail.
- Correct solution
with payments as (
  select * from "organizations"."dbt_dev_on_render"."stg_payments"
)
select order_id, sum(amount) as total_amount from payments group by 1 having sum(amount) < 0;
# Testing Sources
models/staging/jaffle_shop/src_jaffle_shop.yml

version: 2

sources:
  - name: jaffle_shop
    database: raw
    schema: jaffle_shop
    tables:
      - name: customers
        columns:
          - name: id
            tests:
              - unique
              - not_null

      - name: orders
        columns:
          - name: id
            tests:
              - unique
              - not_null
        loaded_at_field: _etl_loaded_at
        freshness:
          warn_after: {count: 12, period: hour}
          error_after: {count: 24, period: hour}
- Complete the following exercises in your dbt project:
- Add tests to your jaffle_shop staging tables:
- Create a file called stg_jaffle_shop.yml for configuring your tests.
- Add unique and not_null tests to the keys for each of your staging tables.
- Add an accepted_values test to your stg_orders model for status.
- Run your tests.
models/staging/jaffle_shop/stg_jaffle_shop.yml
version: 2

models:
  - name: stg_customers
    columns:
      - name: customer_id
        tests:
          - unique
          - not_null

  - name: stg_orders
    columns:
      - name: order_id
        tests:
          - unique
          - not_null
      - name: status
        tests:
          - accepted_values:
              values:
                - completed
                - shipped
                - returned
                - return_pending
- placed- Add the test tests/assert_positive_value_for_total_amount.sql to be run on your stg_payments model.
- Run your tests.
tests/assert_positive_value_for_total_amount.sql
-- Refunds have a negative amount, so the total amount should always be >= 0.
-- Therefore return records where this isn't true to make the test fail.
select
  order_id,
	sum(amount) as total_amount
from {{ ref('stg_payments') }}
group by 1
having not(total_amount >= 0)- Add a relationships test to your stg_orders model for the customer_id in stg_customers.
- Add tests throughout the rest of your models.
- Write your own singular tests.
- name: customer_id
        tests:
          - relationships:
              field: id
to: ref('customers')- Testing is used in software engineering to make sure that the code does what we expect it to.
- In Analytics Engineering, testing allows us to make sure that the SQL transformations we write produce a model that meets our assertions.
- In dbt, tests are written as select statements. These select statements are run against your materialized models to ensure they meet your assertions.
- In dbt, there are two types of tests - generic tests and singular tests:
- Generic tests are written in YAML and return the number of records that do not meet your assertions. These are run on specific columns in a model.
- Singular tests are specific queries that you run against your models. These are run on the entire model.
- dbt ships with four built in tests: unique, not null, accepted values, relationships.
- Unique tests to see if every value in a column is unique
- Not_null tests to see if every value in a column is not null
- Accepted_values tests to make sure every value in a column is equal to a value in a provided list
- Relationships tests to ensure that every value in a column exists in a column in another model (see: referential integrity)
- Generic tests are configured in a YAML file, whereas singular tests are stored as select statements in the tests folder.
- Tests can be run against your current project using a range of commands:
dbt testruns all tests in the dbt projectdbt test --select test_type:genericdbt test --select test_type:singulardbt test --select one_specific_model
- Read more here in testing documentation.
- In development, dbt Cloud will provide a visual for your test results. Each test produces a log that you can view to investigate the test results further.

In production, dbt Cloud can be scheduled to run dbt test. The ‘Run History’ tab provides a similar interface for viewing the test results.

You've learned about the 4 built-in generic tests, but there are so many more tests in packages you could be using! Learn about them in our free online course on Jinja, Macros, and Packages.
Do you want to take your testing knowledge to the next level? Check out our free online course on Advanced Testing!
Q. What file type is used for specifying which generic tests to run by model and column? A. .sql
Q. What are the four generic tests that dbt ships with? A. Not_null, unique, relationships, accepted_values
Q. In what folder should singular tests be saved in your dbt project? A. tests
Q. What command would you use to only run tests configured on a source named my_raw_data? A. dbt test --select source:my_raw_data
Q. Based on the YAML file below, which one of the following statements is true?
**models/staging/payments_sources.yml**
version: 2

models:
  - name: customers
    columns:
      - name: customer_id
        tests:
          - not_null
  - name: payments
    columns:
      - name: payment_id
        tests:
          - unique
          - not_null
      - name: payment_method
        tests:
          - accepted_values:
              values:
                - credit_card
                - ach_transfer
                - paypal
  - name: orders
    columns:
      - name: order_id
        tests:
          - unique
A. The accepted values test will fail if one of the values in the payment_method column is not equal to credit_card, paypal, or ach_transfer
Q. How do you associate a singular test with a particular dbt model or source? A. Using the ref or source macro in the SQL query in the singular test file
Q. What query would you use to create a singular test to assert that no record in cool_model has a value in Column A that is less than the value in Column B? A. select * from {{ ref( ‘cool_model’) }} where Column A < Column B
Q. What is most likely true if a generic test on your sources fails? A. An assumption about your raw data is no longer true
models/staging/jaffle_shop/stg_jaffle_shop.yml
version: 2

models:
  - name: stg_customers
    description: Staged customer data from our jaffle shop app.
    columns:
      - name: customer_id
        description: The primary key for customers.
        tests:
          - unique
          - not_null

  - name: stg_orders
    description: Staged order data from our jaffle shop app.
    columns:
      - name: order_id
        description: Primary key for orders.
        tests:
          - unique
          - not_null
      - name: status
        description: '{{ doc("order_status") }}'
        tests:
          - accepted_values:
              values:
                - completed
                - shipped
                - returned
                - placed
                - return_pending
      - name: customer_id
        description: Foreign key to stg_customers.customer_id.
        tests:
          - relationships:
              to: ref('stg_customers')
              field: customer_id
**models/staging/jaffle_shop/jaffle_shop.md
{% docs order_status %}

One of the following values:

| status         | definition                                       |
|----------------|--------------------------------------------------|
| placed         | Order placed, not yet shipped                    |
| shipped        | Order has been shipped, not yet been delivered   |
| completed      | Order has been received by customers             |
| return pending | Customer indicated they want to return this item |
| returned       | Item has been returned                           |

{% enddocs %}
models/staging/jaffle_shop/src_jaffle_shop.yml
version: 2

sources:
  - name: jaffle_shop
    description: A clone of a Postgres application database.
    database: raw
    schema: jaffle_shop
    tables:
      - name: customers
        description: Raw customers data.
        columns:
          - name: id
            description: Primary key for customers.
            tests:
              - unique
              - not_null

      - name: orders
        description: Raw orders data.
        columns:
          - name: id
            description: Primary key for orders.
            tests:
              - unique
              - not_null
        loaded_at_field: _etl_loaded_at
        freshness:
          warn_after: {count: 12, period: hour}
error_after: {count: 24, period: hour}Using the resources in this module, complete the following in your dbt project:
- Add documentation to the file
models/staging/jaffle_shop/stg_jaffle_shop.yml. - Add a description for your
stg_customersmodel and the columncustomer_id. - Add a description for your
stg_ordersmodel and the columnorder_id.
- Create a doc block for your
stg_ordersmodel to document thestatuscolumn. - Reference this doc block in the description of
statusinstg_orders.
models/staging/jaffle_shop/stg_jaffle_shop.yml
version: 2

models:
  - name: stg_customers
    description: Staged customer data from our jaffle shop app.
    columns:
      - name: customer_id
        description: The primary key for customers.
        tests:
          - unique
          - not_null

  - name: stg_orders
    description: Staged order data from our jaffle shop app.
    columns:
      - name: order_id
        description: Primary key for orders.
        tests:
          - unique
          - not_null
      - name: status
        description: "{{ doc('order_status') }}"
        tests:
          - accepted_values:
              values:
                - completed
                - shipped
                - returned
                - placed
                - return_pending
      - name: customer_id
        description: Foreign key to stg_customers.customer_id.
        tests:
          - relationships:
              to: ref('stg_customers')
              field: customer_id
models/staging/jaffle_shop/jaffle_shop.md
{% docs order_status %}

One of the following values:

| status         | definition                                       |
|----------------|--------------------------------------------------|
| placed         | Order placed, not yet shipped                    |
| shipped        | Order has been shipped, not yet been delivered   |
| completed      | Order has been received by customers             |
| return pending | Customer indicated they want to return this item |
| returned       | Item has been returned                           |

{% enddocs %}
- Generate the documentation by running
dbt docs generate. - View the documentation that you wrote for the
stg_ordersmodel. - View the Lineage Graph for your project.
- Add documentation to the other columns in
stg_customersandstg_orders. - Add documentation to the
stg_paymentsmodel. - Create a doc block for another place in your project and generate this in your documentation.
- Documentation is essential for an analytics team to work effectively and efficiently. Strong documentation empowers users to self-service questions about data and enables new team members to on-board quickly.
- Documentation often lags behind the code it is meant to describe. This can happen because documentation is a separate process from the coding itself that lives in another tool.
- Therefore, documentation should be as automated as possible and happen as close as possible to the coding.
- In dbt, models are built in SQL files. These models are documented in YML files that live in the same folder as the models.
- Documentation of models occurs in the YML files (where generic tests also live) inside the models directory. It is helpful to store the YML file in the same subfolder as the models you are documenting.
- For models, descriptions can happen at the model, source, or column level.
- If a longer form, more styled version of text would provide a strong description, doc blocks can be used to render markdown in the generated documentation.
- In the command line section, an updated version of documentation can be generated through the command
dbt docs generate. This will refresh theview docslink in the top left corner of the Cloud IDE. - The generated documentation includes the following:
- Lineage Graph
- Model, source, and column descriptions
- Generic tests added to a column
- The underlying SQL code for each model
- and more...
Q. What command will generate documentation for your project in development? A. dbt docs generate
Q. Which one of the following statements is true about documentation in dbt? A. dbt will automatically pull descriptions from your dbt project and metadata about your models and sources into the documentation site
Q. What is the correct way to reference the doc block called ‘orders’, contained in a file called docs_jaffle_shop.md? A. description: ‘{{ doc(“orders”) }}’
Q. What aspects of the generated DAG can help you understand your data flow? A.
-
Dependencies between models can help identify how code is used and possible redundancies
-
The selector can help narrow the scope of the shown DAG, which allows you to see how your specific model is used upstream and/or downstream
- Understand why it's necessary to deploy your project.
- Explain the purpose of creating a deployment environment.
- Schedule a job in dbt Cloud.
- Review the results and artifacts of a scheduled job in dbt Cloud.
- Development in dbt is the process of building, refactoring, and organizing different files in your dbt project. This is done in a development environment using a development schema (
dbt_jsmith) and typically on a non-default branch (i.e. feature/customers-model, fix/date-spine-issue). After making the appropriate changes, the development branch is merged to main/master so that those changes can be used in deployment. - Deployment in dbt (or running dbt in production) is the process of running dbt on a schedule in a deployment environment. The deployment environment will typically run from the default branch (i.e., main, master) and use a dedicated deployment schema (e.g.,
dbt_prod). The models built in deployment are then used to power dashboards, reporting, and other key business decision-making processes. - The use of development environments and branches makes it possible to continue to build your dbt project without affecting the models, tests, and documentation that are running in production.
- A deployment environment can be configured in dbt Cloud on the Environments page.
- General Settings: You can configure which dbt version you want to use and you have the option to specify a branch other than the default branch.
- Data Warehouse Connection: You can set data warehouse specific configurations here. For example, you may choose to use a dedicated warehouse for your production runs in Snowflake.
- Deployment Credentials: Here is where you enter the credentials dbt will use to access your data warehouse:
- IMPORTANT: When deploying a real dbt Project, you should set up a separate data warehouse account for this run. This should not be the same account that you personally use in development.
- IMPORTANT: The schema used in production should be different from anyone's development schema.
- Scheduling of future jobs can be configured in dbt Cloud on the Jobs page.
- You can select the deployment environment that you created before or a different environment if needed.
- Commands: A single job can run multiple dbt commands. For example, you can run
dbt runanddbt testback to back on a schedule. You don't need to configure these as separate jobs. - Triggers: This section is where the schedule can be set for the particular job.
- After a job has been created, you can manually start the job by selecting
Run Now
- The results of a particular job run can be reviewed as the job completes and over time.
- The logs for each command can be reviewed.
- If documentation was generated, this can be viewed.
- If
dbt source freshnesswas run, the results can also be viewed at the end of a job.
Curious to know more about deploying with dbt Cloud? Check out our free online Advanced Deployment course, where you'll learn how to deploy your dbt Cloud project with advanced functionality including continuous integration, orchestrating conflicting jobs, and customizing behavior by environment!
Q. Which one of the following are true about running your dbt project in production? A. Running dbt in production should use a different database schema than I used in development
Q. When does a dbt job run? A. At whatever cadence you set up for the job
Q. The following commands are configured for a production job in dbt Cloud.
dbt seed
dbt test --select source
dbt run
dbt test --exclude source
If any of the tests on sources fails, how will dbt Cloud handle the rest of the commands?
A. dbt will not execute any further commands
Q. Consider a production job where you have the following commands and have enabled docs generation.
dbt run
dbt test
What will be the correct order of invoked dbt commands in the run history after ‘clone git repository’ and ‘create profile from connection’?
A. dbt deps >> dbt run >> dbt test >> dbt docs generate
Q. Which one of the following is true about development and deployment environments? A. Deployment environments are used for running code on a schedule and development environments are used for developing code.
Q. After developing models in dbt, which one of the following steps is the final step to ensure your code runs in production? A. The code has been reviewed and merged into the default branch