0. Getting Started
- Raspberry Pi Homepage
- Raspberry Pi Official Documentaion
- Raspberry Pi Forums
- Raspberry Pi StackExchange
- Raspberry Pi 2 Model B
- Raspberry Pi Code
- Raspberry Pi Unofficial Wiki
- Raspberry Pi Pinout
- Acrobotic Hackathon Kit
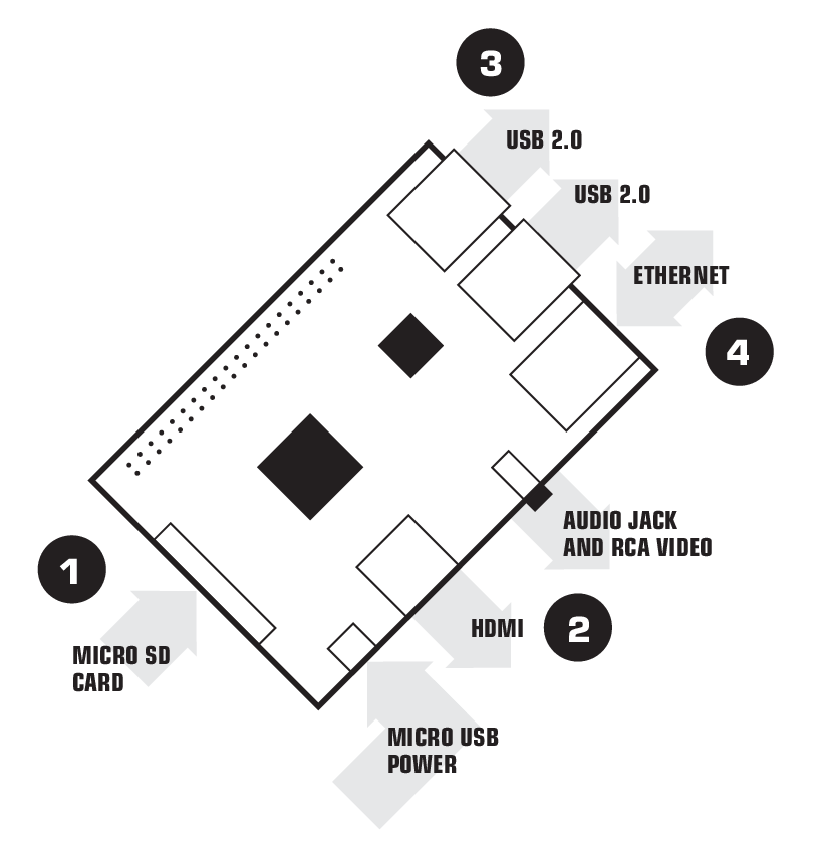
- Assemble PiTray enclosure by following the assembly instructions.
- Insert NOOBS (New Out Of the Box Software) microSD card.
- Connect monitor using HDMI to DVI.
- Connect mini wireless keyboard and touchpad RF USB transceiver.
- Connect wireless USB adapter.
- Connect the 5V/2A micro-USB wall adapter to micro-USB host port.
- Change default GB/UK language and keyboard layout to US.
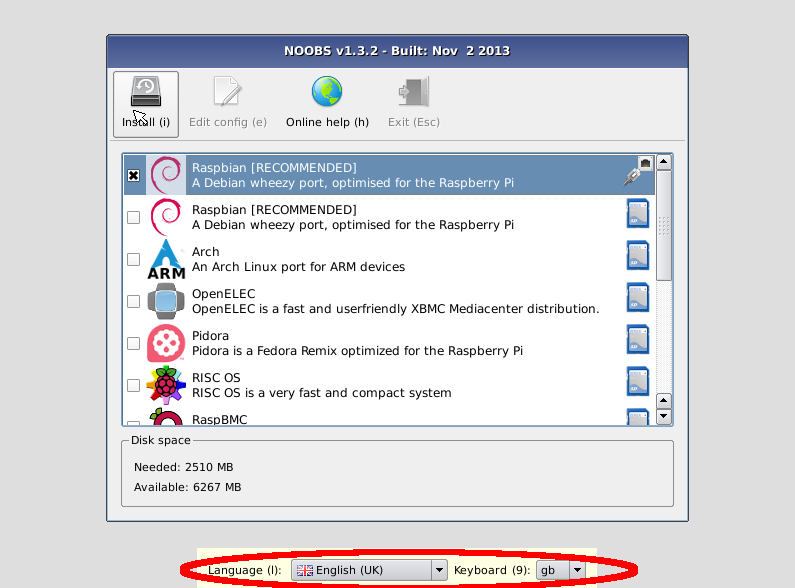
- Click Install.
- After installation is complete installer will reboot.
- On first boot, the Raspberry Pi Configuration Tool (
raspi-config) will start.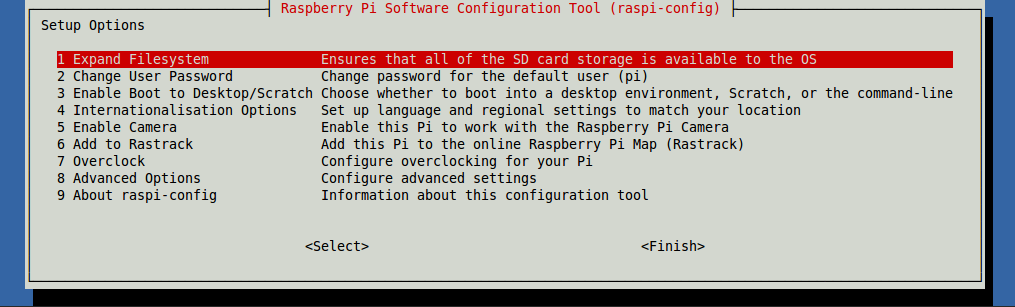
- Select "Enable Boot the Desktop/Scratch" and select "Desktop Log in as user 'pi' at the graphical desktop".
- Select Finish.
- Select Yes to allow reboot.
- The default login for Raspbian is username
piwith the passwordraspberry. - If you did not enable the graphical user interface to start automatically, type
startx. Usesudo raspi-configfrom a terminal to configure the automatic startup of the graphical interface.
SSH is enabled by default. See http://www.raspberrypi.org/documentation/remote-access/ssh/ for information on SSH clients.
-
sudo apt-get update -
sudo apt-get install x11vnc -
mkdir -p /home/pi/.config/autostart -
leafpad /home/pi/.config/autostart/vnc.desktop -
Enter the following
[Desktop Entry]
Type=Application
Name=VNC
Exec=x11vnc -display :0 -forever
StartupNotify=false
- Log in to a Windows workstation using your personal Windows domain credentials,
- Click the Start button, Run, then type
mmc. - Click File > "Add/Remove Snap in...".
- Click Certificates.
- Click Add.
- Select "My User Account".
- Click Finish.
- Expand "Certificates - Current User" > Personal > Certificate.
- Right-click the personal certificate
- Left-click All Tasks > Export... (Intended Purpose = Client Authentication)
- Select "Yes, export the Private Key".
- Click Next.
- Select Choose "Include all certificates in the certification path if possible" and "Export all extended properties".
- Enter a password and confirm the password.
- Click Browse to save the file to your desktop or the location you prefer.
- Enter the file name
mycert.pfx. - Click Finish.
- Transfer certificate file
mycert.pfxto the Raspberry Pi/home/pidirectory.
- If you have a wired Ethernet connection established and an SSH client on the host computer:
scp mycert.pfx pi@respberrypi.local:/home/pi/
-
Open a terminal.
-
cd /home/pi -
openssl pkcs12 -in mycert.pfx -clcerts -out user.pem -
Enter password used when exporting PFX certificate.
-
Enter same (or new) password for the PEM certificate.
-
openssl pkcs12 -in mycert.pfx -cacerts -nokeys -out myca.crt -
Enter password used when exporting PFX certificate.
-
sudo mv myca.crt /usr/local/share/ca-certificates/ -
sudo leafpad /etc/wpa_supplicant/wpa_supplicant.conf -
Edit contents to contain the following. Where
ssidis the name of your wireless network and identity if your fully qualified domain username (e.g.username@domain.example.com). If this file already exists, skip the first two lines below.ctrl_interface=DIR=/var/run/wpa_supplicant GROUP=netdev update_config=1 network={ ssid="myssid" key_mgmt=WPA-EAP pairwise=TKIP eap=TLS identity="username@domain.example.com" client_cert="/home/pi/user.pem" private_key="/home/pi/user.pem" private_key_passwd="my key password" ca_cert="/usr/local/share/ca-certificates/myca.crt" } -
sudo leafpad /etc/network/interfaces -
Add the following on line 2.
auto wlan0 -
sudo service networking restart(if you are connected via SSH or VNC, you will be disconnected) -
Use
ifconfig wlan0to determine your current wireless IP address.
-
Open a terminal.
-
sudo apt-get install festival festvox-kallpc16k -
leafpad /home/pi/sayip.sh -
Enter the following.
#!/usr/bin/env bash # Say the IP address _IP=$(hostname -I) if [ "$_IP" ]; then MY_IP=`hostname -I | sed -e 's/\./ dot /g' -e 's/[0123456789]/ & /g'` echo "Hello, this is Raspberry Pie. My I P address is $MY_IP" | /usr/bin/festival --tts fi exit 0 -
chmod +x /home/pi/sayip.sh -
sudo leafpad /etc/network/interfaces -
Append the following to both the
iface eth0andiface wlan0stanza.post-up /home/pi/sayip.sh -
amixer cset numid=3 1 -
Connect a speaker or headphones to the audio jack.
-
Test your script by running
/home/pi/sayip.sh -
sudo reboot
sudo dpkg-reconfigure tzdata- Select "America/Los_Angeles"
This will keep your clock synchronized with the pool.ntp.org NTP time server. This will persist across reboots.
sudo apt-get updatesudo apt-get install ntpdate
-
Open a terminal.
-
sudo leafpad /etc/X11/xinit/xinitrc(or/etc/xdg/lxsession/LXDE/autostart) -
Enter the following
@xset s off @xset -dpms @xset s noblank -
sudo leafpad /etc/lightdm/lightdm.conf -
Enter the following under the
[SeatDefault]sectionxserver-command=X -s 0 dpms
- Open a terminal.
sudo leafpad /etc/rc.local- Before the
exit 0(last line), add the absolute path to your program followed by an ampersand (e.g./path/to/program.sh &) to the script you wish to have started automatically on boot.
-
Open a terminal.
-
mkdir -p /home/pi/.config/autostart/ -
leafpad /home/pi/.config/autostart/program.desktop -
Add the following (
Execto point to the absolute path to your program).[Desktop Entry] Type=Application Exec=/path/to/program.sh
This is useful during development because it allows you to easily see your console program terminal output and to be able to terminate it easily (Ctrl-C).
-
Open a terminal.
-
mkdir -p /home/pi/.config/autostart/ -
leafpad /home/pi/.config/autostart/console_program.desktop[Desktop Entry] Type=Application Terminal=false Exec=lxterminal --command "/path/to/console/program.sh"
See #SUDOERS at http://www.raspberrypi.org/documentation/linux/usage/users.md.
-
Broadcom BCM2836 SoC
-
900MHz quad-core ARM Cortex-A7 CPU (ARMv7 instruction set)
-
Hardware floating point
-
1GB LPDDR2 RAM (shared with GPU)
-
VideoCore IV 3D graphics core
-
Broadcom VideoCore IV @ 250 MHz, OpenGL ES 2.0 (24 GFLOPS), 1080p30 MPEG-2 and VC-1 decoder (with license), 1080p30 h.264/MPEG-4 AVC high-profile decoder and encoder
-
No on-board flash memory
-
4 USB 2.0 ports
-
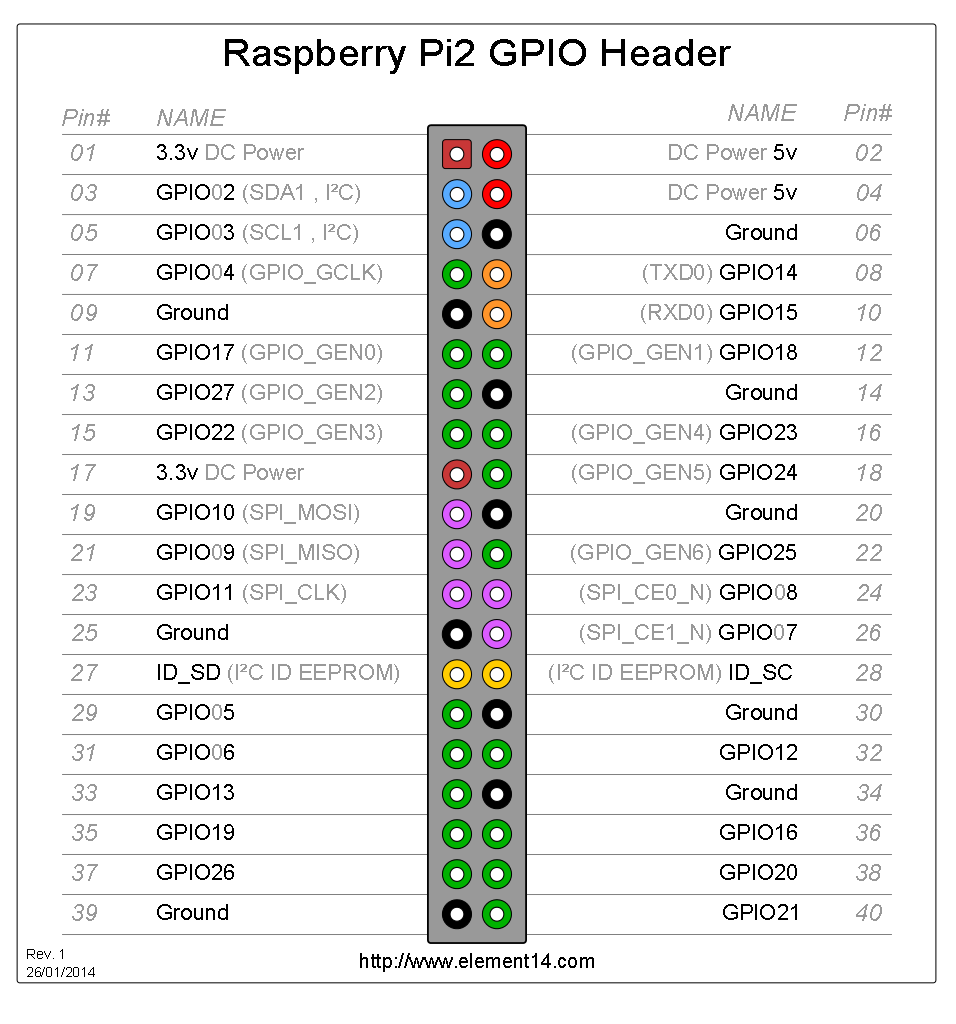
40 GPIO pins 2.54 mm (100 mil) expansion header: 2x20 strip
-
Providing 27 GPIO pins as well as +3.3 V, +5 V and GND supply lines
-
Full-sized HDMI (rev 1.3 & 1.4) port
-
10/100 Ethernet port
-
Combined 3.5mm audio jack and composite video
-
Camera interface (CSI)
-
Display interface (DSI)
-
MicroSD (SDIO) card slot
-
JTAG (not populated)
-
Only one PWM channel (GPIO18)
-
No analog input/output 😦
-
For analog to digital input and output conversion or if you require a smooth analog output, get an 8-bit ADC/DAC I2C device.
-
For analog input and PWM output, add an Arduino to your project using a Proto Hat, 4-channel MOSFET level shifter, and a Breaduino.