One of the key features in Rx is that you don't know when items will be emitted. Some observables will emit everything immediately and synchronously(e.g. range), some emit on regular intervals, and some are hard or even impossible to predict. For example, mouse events and UDP packets simply arrive when they arrive. We need tools to decide what to do with those events, not only based on what they are, but also based on when they arrived and at what frequency.
buffer allows you to collect values and get them in bulks, rather than one at a time. The are several different ways of buffering values.
First we will examine variants of buffer where every value is buffered exactly once, with no losses and no duplicates.
The simplest overload groups a fixed number of values together and emits the group when it's ready.
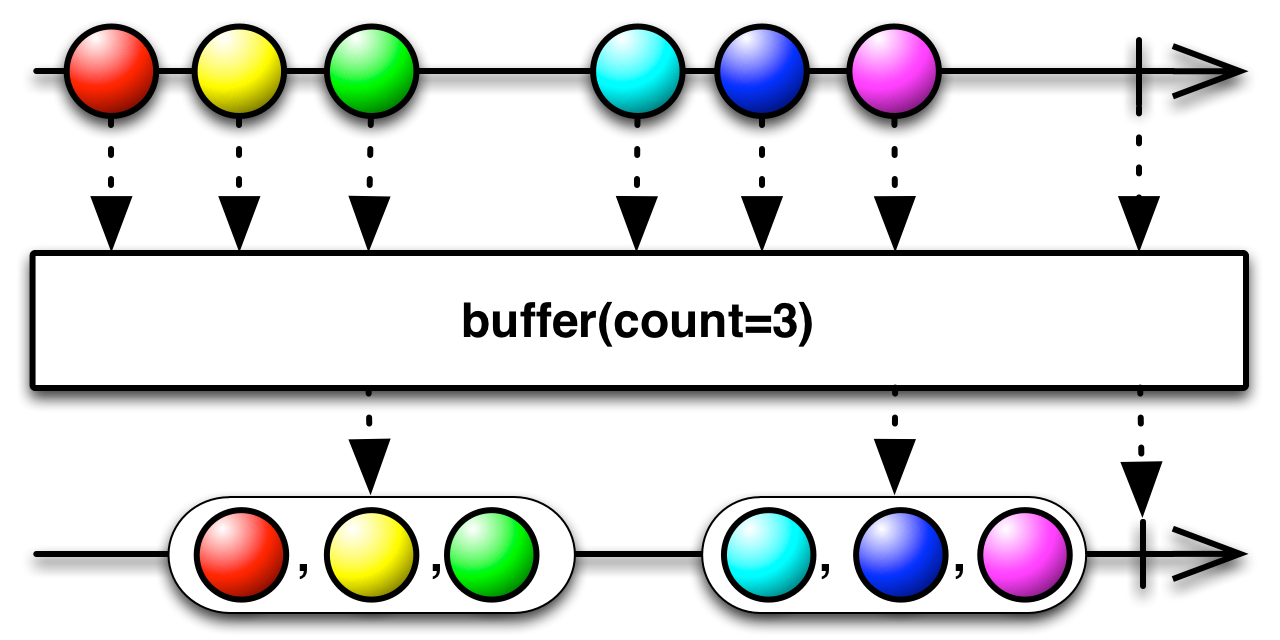
Observable.range(0, 10)
	.buffer(4)
.subscribe(System.out::println);[0, 1, 2, 3]
[4, 5, 6, 7]
[8, 9]
The next overload allows you to buffer based on time. Time is divided into windows of equal length. Values are collected for the each window and at the end of each window the buffer is emited.
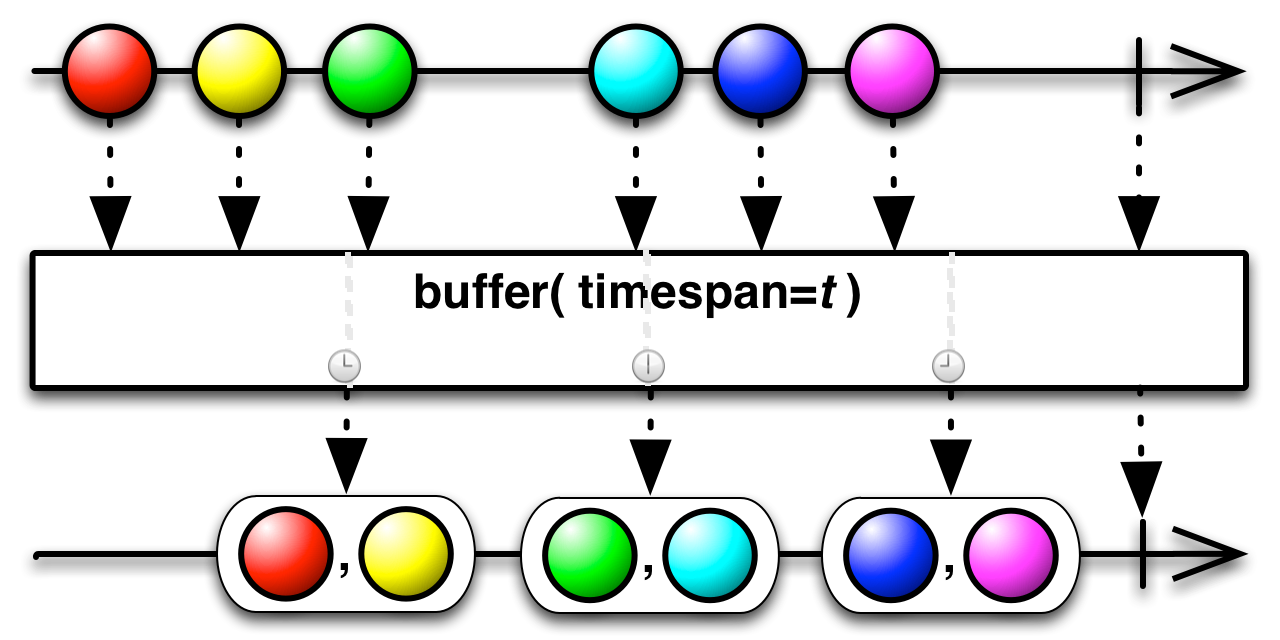
In the next example, we produce values every 100ms and buffer them in windows of 250ms.
Observable.interval(100, TimeUnit.MILLISECONDS).take(10)
	.buffer(250, TimeUnit.MILLISECONDS)
.subscribe(System.out::println);[0, 1]
[2, 3]
[4, 5, 6]
[7, 8]
[9]
The size of a collection here depends on how many values were emitted in that timespan and not on a desired size. The collection can even be empty, if there where no events during the window.
You can use both a buffer size and a timespan to buffer values. The buffered values are emitted if either the buffer is full or if the time slot ends and a new one starts.
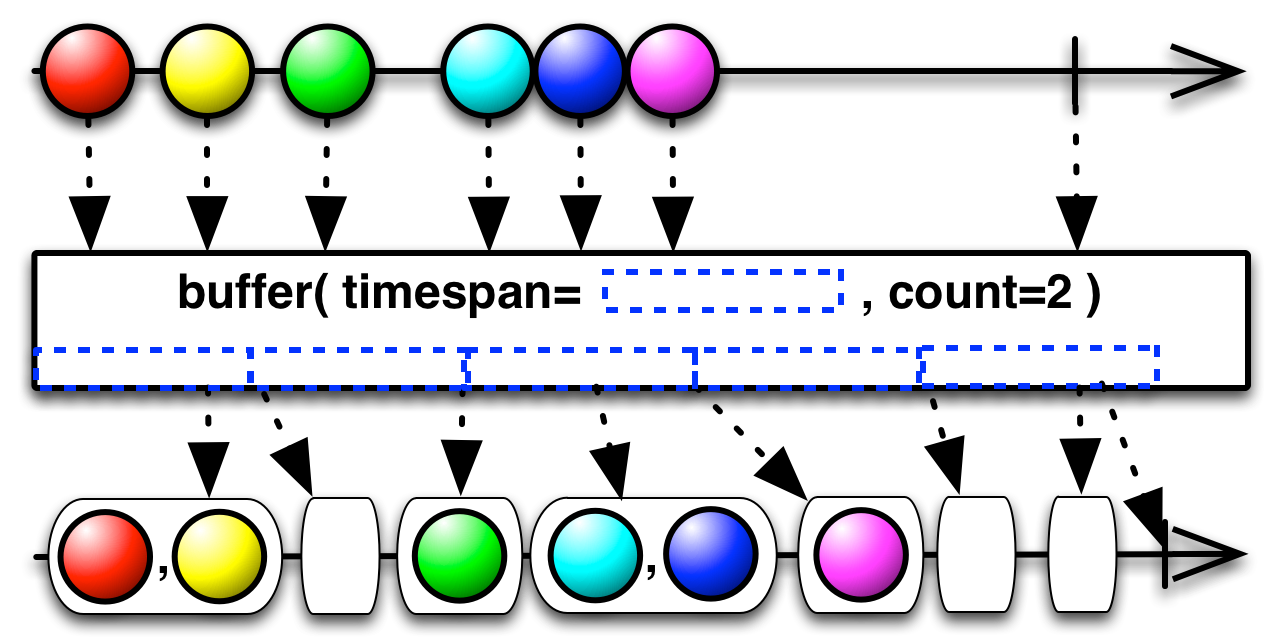
Observable.interval(100, TimeUnit.MILLISECONDS)
	.take(10)
	.buffer(250, TimeUnit.MILLISECONDS, 2)
.subscribe(System.out::println);[0, 1]
[]
[2, 3]
[]
[4, 5]
[6]
[7, 8]
[]
[9]
We see a lot of empty lists here. This is because the buffer is emitted both when it reaches size 2 and when a time window closes. As we can see from our previous example, only two values belong in those windows. Since the buffer was emptied when it reached size 2, it is empty when the window closes.
Instead of fixed points in time, you can also signal buffer with an observable to flush. Every time the signal emits onNext, the values in the buffer will be emitted. Buffering with a signal can be very useful if you want to buffer values until the moment that you are ready for them.
The following example does the same as .buffer(250, TimeUnit.MILLISECONDS)
Observable.interval(100, TimeUnit.MILLISECONDS).take(10)
	.buffer(Observable.interval(250, TimeUnit.MILLISECONDS))
	.subscribe(System.out::println);
There is a variant for the way above, where you provide the signaling observable through a function: .buffer(() -> Observable.interval(250, TimeUnit.MILLISECONDS)). The difference here is that the function that creates the observable is executed when a subscription happens. You can use to start your signal when the subscription starts.
Every method for buffering that we've seen has an alternative that allows buffers to overloap or to leave out values.
When buffering based on the desired buffer size, you can also declare how far apart the beginings of each buffer are.
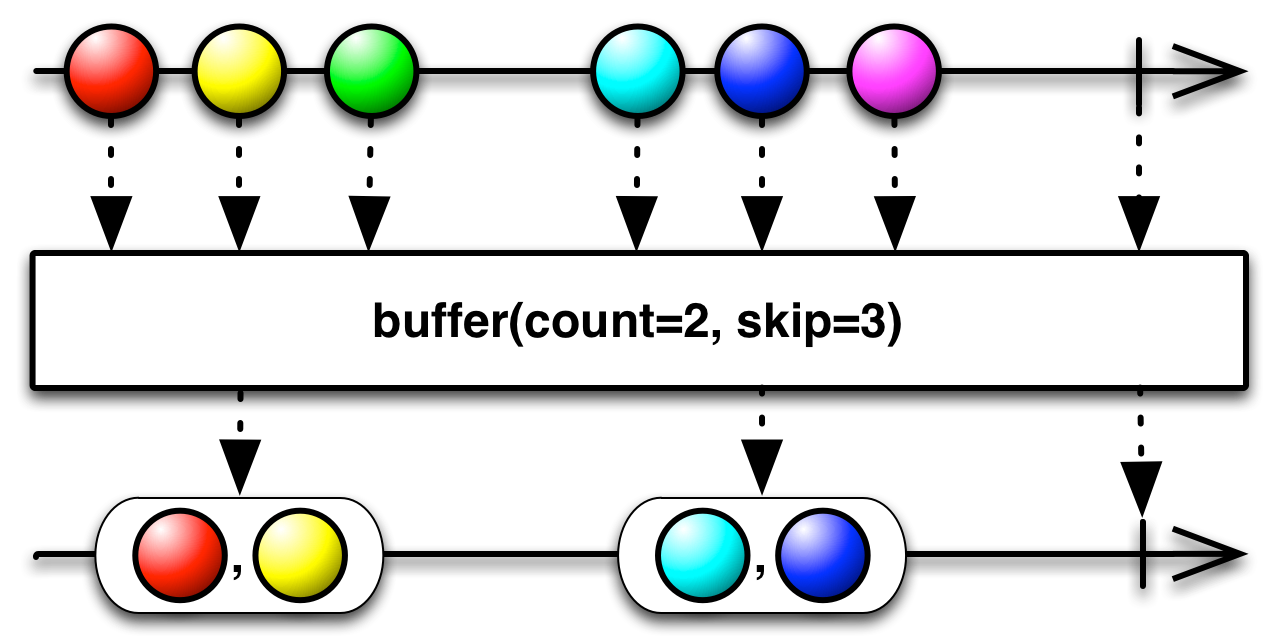
As we can see in the marble diagram, we start a new buffer every 3 values but the buffer is limited to 2 values. Therefore, every third element is left out. You can also start the new buffer before the previous buffer closes.
- When
count>skip, the buffers overlap - When
count<skip, elements are left out - The case of
count=skipis equivalent to the simpler case we saw in the previous subchapter.
Here's an example in code, where the buffers overlap
Observable.range(0,10)
	.buffer(4, 3)
	.subscribe(System.out::println);
Output
[0, 1, 2, 3]
[3, 4, 5, 6]
[6, 7, 8, 9]
[9]
As we can see, a new buffer starts every 3 elements, and that buffer contains the next 4 elements.
We can do a very similar thing for the variant where buffering is based on a timespan. You decide how frequently to open new buffers and how long they should last.
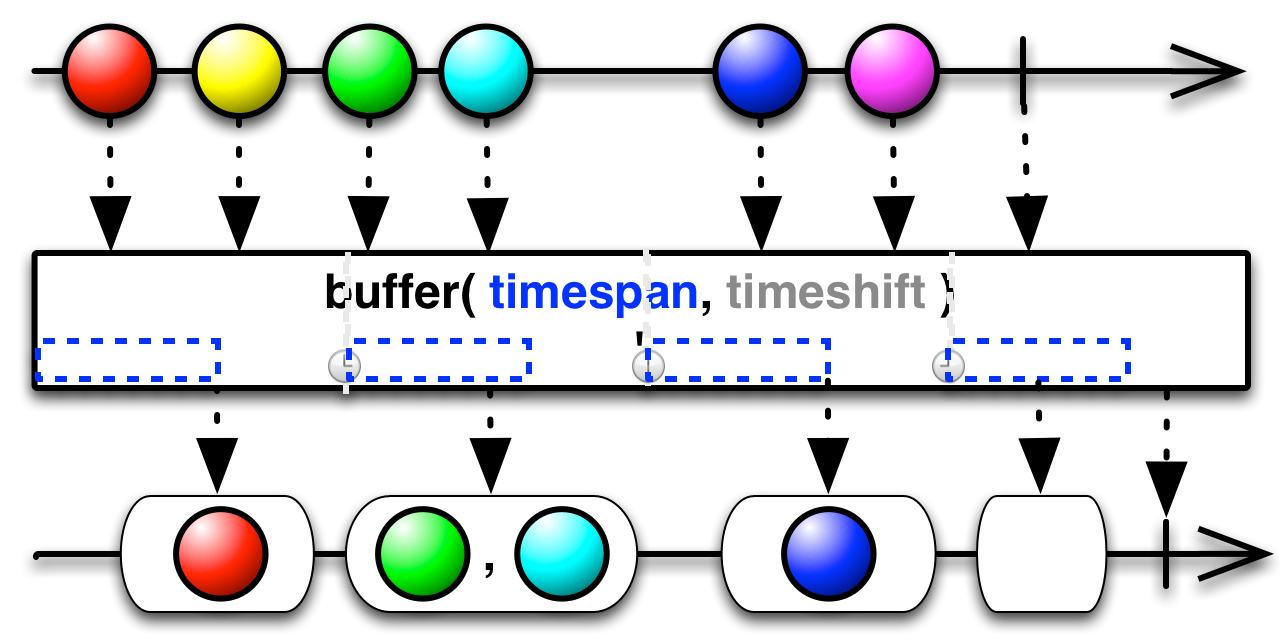
- When
timespan>timeshift, the buffers overlap - When
timespan<timeshift, elements are left out - The case of
timespan=timeshiftis equivalent to the simpler case we saw in the previous subchapter.
In the next example we will create a new buffer every 200ms and have it collect for 350ms. That means that buffers overlap by 150ms.
Observable.interval(100, TimeUnit.MILLISECONDS).take(10)
	.buffer(350, 200, TimeUnit.MILLISECONDS)
.subscribe(System.out::println);[0, 1, 2]
[2, 3, 4]
[3, 4, 5, 6]
[5, 6, 7, 8]
[7, 8, 9]
[9]
The last and most powerful variant of buffer allows you to define the start and the end of buffers using signaling observables.
public final <TOpening,TClosing> Observable<java.util.List<T>> buffer(
	Observable<? extends TOpening> bufferOpenings,
	Func1<? super TOpening,? extends Observable<? extends TClosing>> bufferClosingSelector)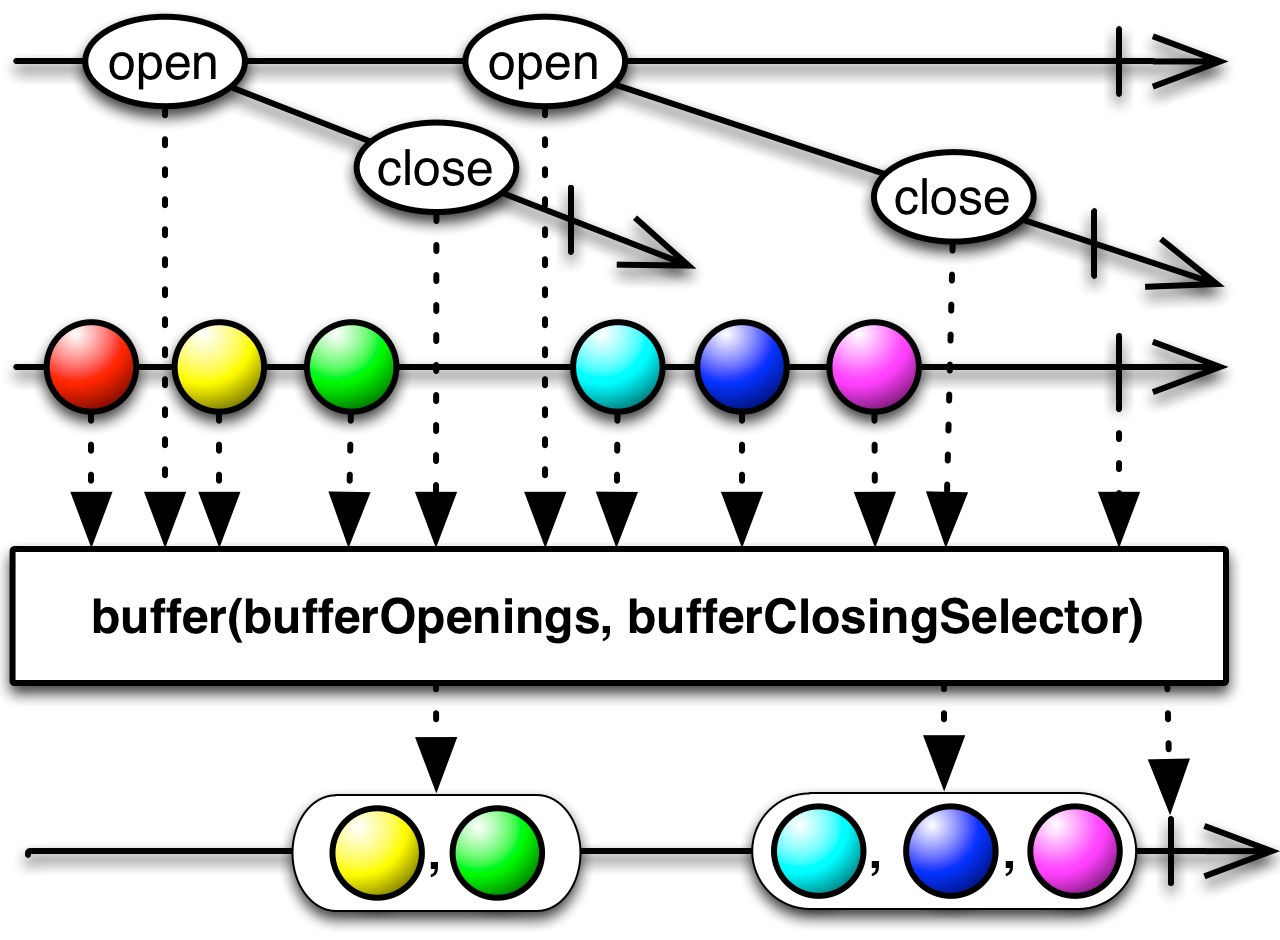
This function takes two arguments. The first argument, bufferOpenings, is an observable. Every time this observable emits a value, a new buffer begins. Along with opening a new buffer, the value which it emitted is passed to the bufferClosingSelector, which is a function. This function uses the value to create a new observable, which will signal the end of the corresponding buffer when it emits its first onNext event.
Let's see this in code:
Observable.interval(100, TimeUnit.MILLISECONDS).take(10)
	.buffer(
		Observable.interval(250, TimeUnit.MILLISECONDS),
		i -> Observable.timer(200, TimeUnit.MILLISECONDS))
.subscribe(System.out::println);[2, 3]
[4, 5]
[7, 8]
[9]
We've created an Observable.interval, which signals the opening of a new buffer every 250ms. Because observables created with interval do not immediately emit a value, and first buffer actually starts at 250ms and the values before were lost. For the closing of a buffer, we provided a lambda function that took every value emitted by bufferOpenings. The values generated by interval are the natural progression 0,1,2,3... but we don't actually use the value, because such an example would be too complicated. Instead, we just created an observable that waits 200ms and then emits a single value. That means that each buffer last exactly 200ms, similarily to buffering by time.
We have already seen the takeLast operator, which returns the last N number of items. Internally, takeLast needs to buffer items and re-emits them when the source sequence ends. The takeLastBuffer operator returns the last elements as one buffer.
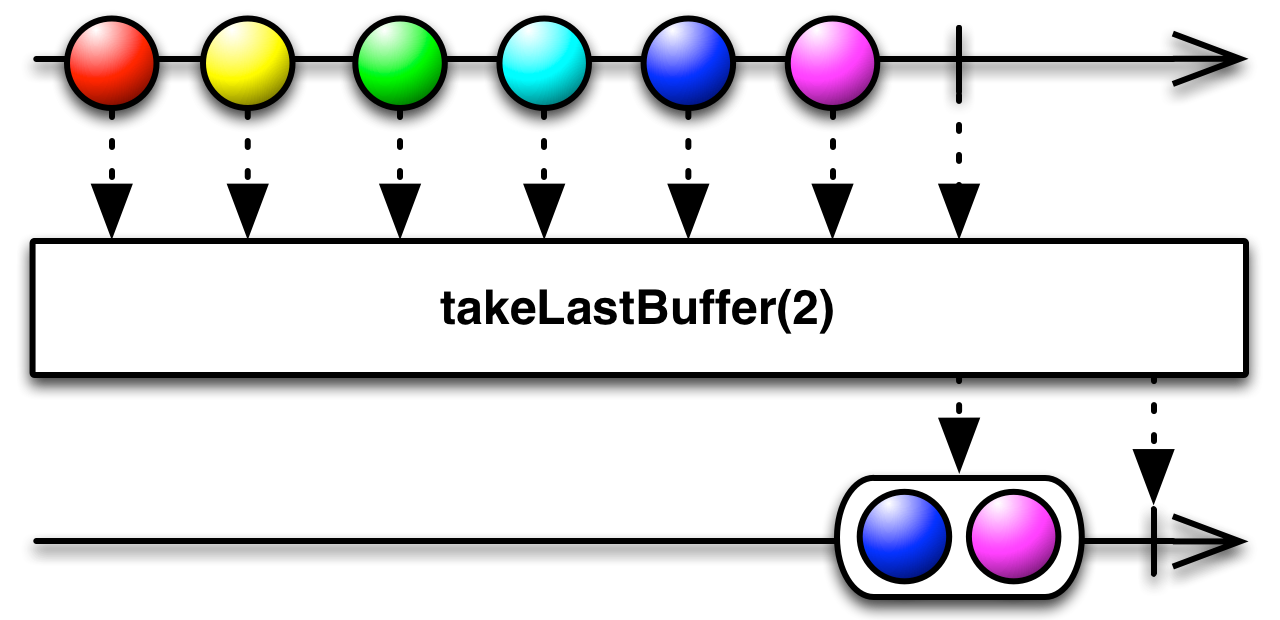
takeLastBuffer by count will emit the last N elements in a list.
Observable.range(0, 5)
	.takeLastBuffer(2)
.subscribe(System.out::println);[3, 4]

takeLastBuffer by time will emit, as a buffer, the items that were received during the specified timespan, which is measure from the end of the source sequence.
Observable.interval(100, TimeUnit.MILLISECONDS)
	.take(5)
	.takeLastBuffer(200, TimeUnit.MILLISECONDS)
.subscribe(System.out::println);[2, 3, 4]
The buffer emitted by this overload of takeLastBuffer will contain items that were emitted over the specified timespan before the end. If this window contains more than the specified number of items, the buffer will contain the last N items.
Observable.interval(100, TimeUnit.MILLISECONDS)
	.take(5)
	.takeLastBuffer(2, 200, TimeUnit.MILLISECONDS)
.subscribe(System.out::println);[3, 4]
As we saw in the previous example, the last 200ms include three values. With .takeLastBuffer(2, 200, TimeUnit.MILLISECONDS) we specified that we want values from the last 200ms, but no more than 2 values. For that reason, we only get the last two values.
delay, as the name suggests, will postpone the emission of values for a specified amount of time. The are two ways to do that. One is by storing values until you are ready to emit them. The other is to delay the subscription to observable.
The simplest overload of delay will delay every item by the same amount of time. You can think of it as delaying the beginning of the sequence, while maintaining the time intervals between successive elements.
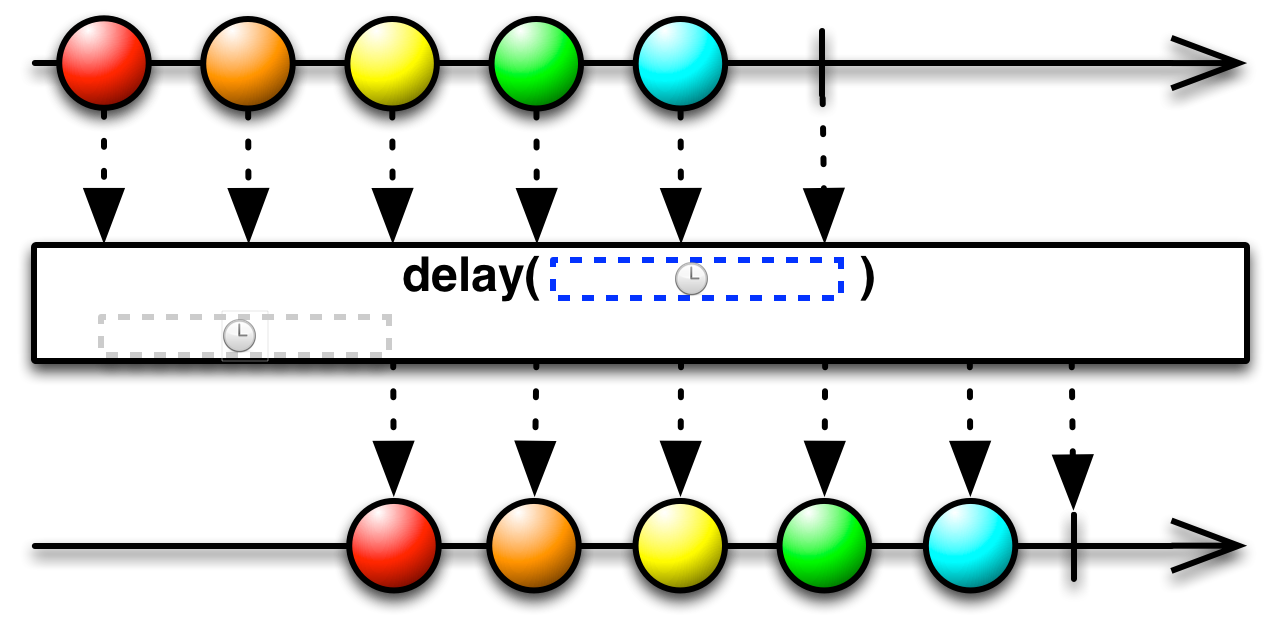
Here's an example in code
Observable.interval(100, TimeUnit.MILLISECONDS).take(5)
			.delay(1, TimeUnit.SECONDS)
			.timeInterval()
.subscribe(System.out::println);TimeInterval [intervalInMilliseconds=1109, value=0]
TimeInterval [intervalInMilliseconds=94, value=1]
TimeInterval [intervalInMilliseconds=100, value=2]
TimeInterval [intervalInMilliseconds=100, value=3]
TimeInterval [intervalInMilliseconds=101, value=4]
We created 5 values spaced 100ms apart and then we delayed the sequence by 1s. We can see that the first value takes ~(1000 + 100)ms and the next values take 100ms each.
You can also delay each value individually.
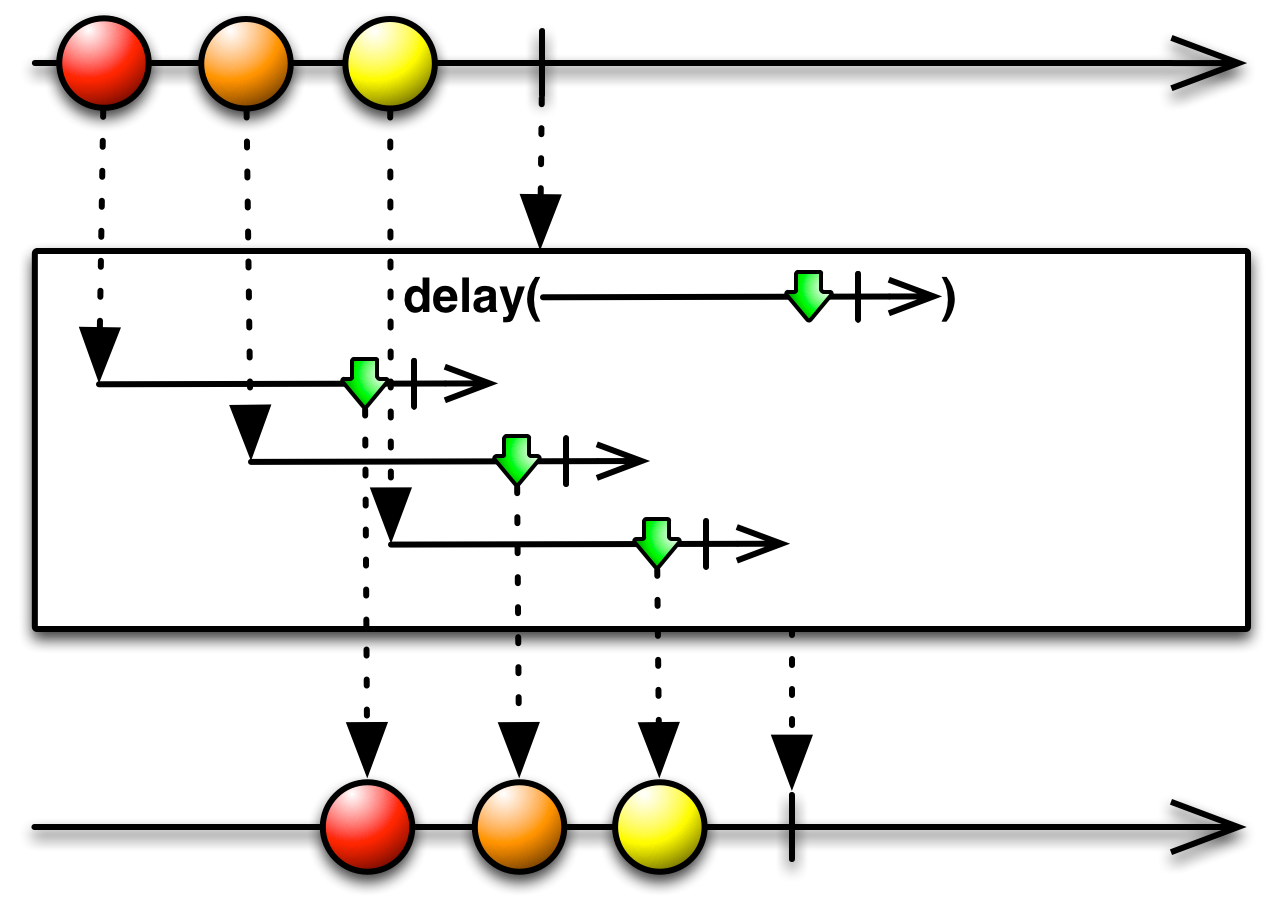
Observable.interval(100, TimeUnit.MILLISECONDS).take(5)
	.delay(i -> Observable.timer(i * 100, TimeUnit.MILLISECONDS))
	.timeInterval()
.subscribe(System.out::println);TimeInterval [intervalInMilliseconds=152, value=0]
TimeInterval [intervalInMilliseconds=173, value=1]
TimeInterval [intervalInMilliseconds=199, value=2]
TimeInterval [intervalInMilliseconds=201, value=3]
TimeInterval [intervalInMilliseconds=199, value=4]
The initial sequence is spaced 100ms apart, while the resulting is 200ms. If you remember, interval emits the numbers i = 1,2,3,etc. We delay each item i by i*100, so the first item is delayed by 100ms, then second by 200ms, the third by 300ms. The difference between the successive delays is 100ms. Added to the initial 100ms interval, that results in 200ms interval between items.
Rather than storing values and emitting them later, you can delay the subscription altogether. This will have a different effect depending on if the observable is hot or cold. This will be discussed more in the [Hot and cold observables](/Part 3 - Taming the sequence/6. Hot and Cold observables.md) chapter. For our examples so far, the observables are cold and subscription event is when the source observable is created (i.e. the begining of the sequence). What that means is that there is no difference in the sequences between delaying each item by the same amount and delaying the subscription. Since that is the case here, delaying the subscription is more efficient, since the operator doesn't need to buffer items internally.
Let's see code for the different overloads for delaying a subscription
Observable.interval(100, TimeUnit.MILLISECONDS).take(5)
	.delaySubscription(1000, TimeUnit.MILLISECONDS)
	.timeInterval()
.subscribe(System.out::println);TimeInterval [intervalInMilliseconds=1114, value=0]
TimeInterval [intervalInMilliseconds=92, value=1]
TimeInterval [intervalInMilliseconds=101, value=2]
TimeInterval [intervalInMilliseconds=100, value=3]
TimeInterval [intervalInMilliseconds=99, value=4]
What we see here is that the subscription of the interval observable (i.e. its creation) was delayed by 1000ms. After that, the sequence goes as defined.
You can also delay the subscription based on a signaling observable through the following overload:
public final <U> Observable<T> delaySubscription(Func0<? extends Observable<U>> subscriptionDelay)The argument is a function that will create a new observable for each subscription. The subscription is delayed until the corresponding observable emits a value. The following example is equivalent to the one we've just seen.
Observable.interval(100, TimeUnit.MILLISECONDS).take(5)
	.delaySubscription(() -> Observable.timer(1000, TimeUnit.MILLISECONDS))
	.timeInterval()
.subscribe(System.out::println);The last method in this category allows you to delay both the subscription and each item individually.
public final <U,V> Observable<T> delay(
	Func0<? extends Observable<U>> subscriptionDelay,
	Func1<? super T,? extends Observable<V>> itemDelay)
This combines two delay variants we've already seen into one. The first argument is a function that creates an observable that will signal when to perform the subscription. The second argument takes every item and decides how long it should be delayed.
sample allows you to thin-out a sequence by dividing it into time windows and taking only one value out of each window. When each window ends, the last value within that window (if any) is emitted.
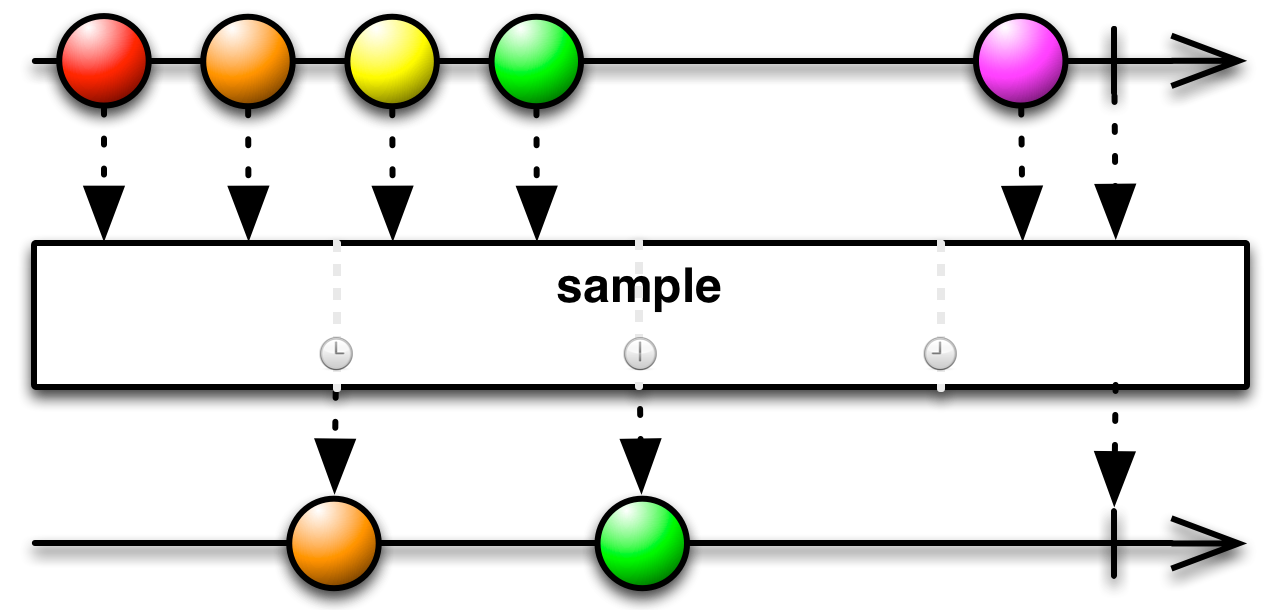
Observable.interval(150, TimeUnit.MILLISECONDS)
	.sample(1, TimeUnit.SECONDS)
.subscribe(System.out::println);5
12
18
...
The division of time doesn't have to be uniform. You can specify the end of each part with a signaling observable.
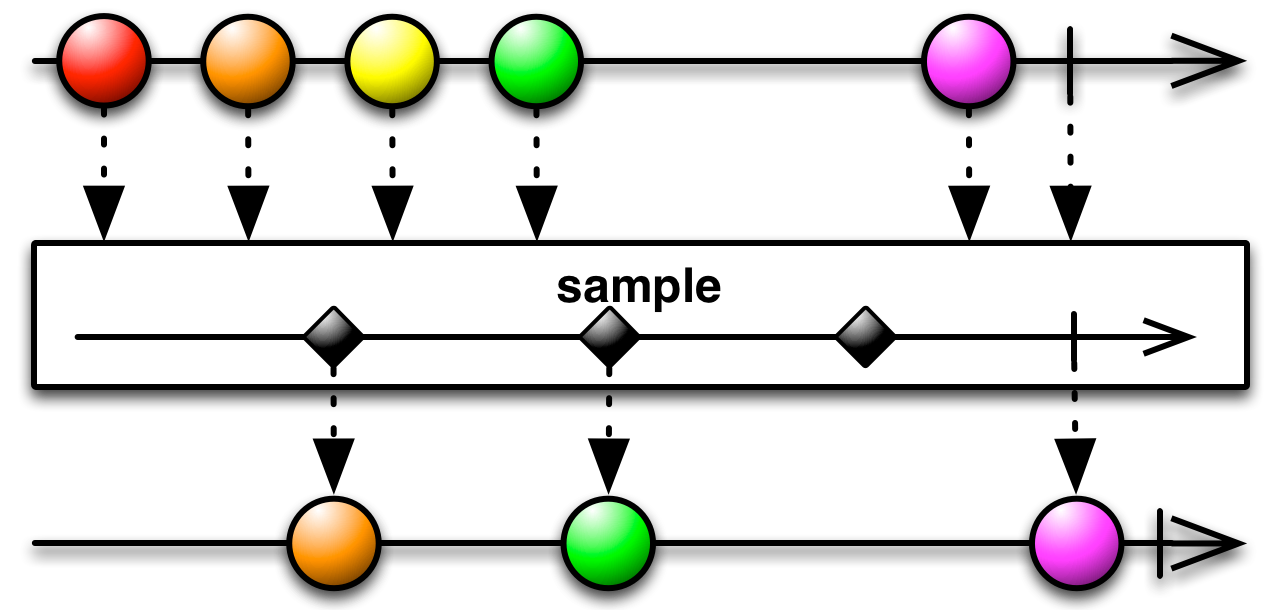
The following code does the same thing as before
Observable.interval(150, TimeUnit.MILLISECONDS)
	.sample(Observable.interval(1, TimeUnit.SECONDS))
	.subscribe(System.out::println);
Throttling is also intended for thinning out a sequence. When the producer emits more values than we want and we don't need every sequential value, we can thin out the sequence by throttling it.
The throttleFirst operators filter out values relative to the values that were already accepted. After a value has been accepted, values will be rejected for the duration of the window. Once The window expires, the next value will be accepted and a new window starts.

Observable.interval(150, TimeUnit.MILLISECONDS)
	.throttleFirst(1, TimeUnit.SECONDS)
.subscribe(System.out::println);0
7
14
...
Here, interval emits every 150ms. The values seen as output were emitted at (i+1)*150ms, relative to the start of the sequence. The first item is emitted at 150ms and is accepted by default. Now items are rejected for the next 1000ms. The first item after that comes at 1200ms. Again, items are rejected for the next 1000ms, so the next item comes at 2250ms.
The throttleLast operator divides time at regular intervals, rather than relative to the last item. it emits the last value in each window, rather than the first after it.

Observable.interval(150, TimeUnit.MILLISECONDS)
	.throttleLast(1, TimeUnit.SECONDS)
.subscribe(System.out::println);5
12
18
...
Here, a window starts with the creation of the sequence at 0ms. That window expires at 1000ms and the last value in that window was at 900ms. The next window last 1000ms until 2000ms. The last item in that window is at 1950. In the next window, the item is at 2850ms.
In this operator, a time window starts every time a value is received. Once the window expires, the value is emitted. If, however, another value is received before the window expires, the previous value is rejected and the window restarts for the next value.
Demonstrating this is a bit more complicated, since an interval observable will either have all of its values accepted or only its last value accepted (which is never if the observable is infinite). For that reason we will construct a more complicated observable.
Observable.concat(
		Observable.interval(100, TimeUnit.MILLISECONDS).take(3),
		Observable.interval(500, TimeUnit.MILLISECONDS).take(3),
		Observable.interval(100, TimeUnit.MILLISECONDS).take(3)
	)
	.scan(0, (acc, v) -> acc+1)
	.timeInterval()
	.subscribe(System.out::println);
Output
TimeInterval [intervalInMilliseconds=110, value=0]
TimeInterval [intervalInMilliseconds=1, value=1]
TimeInterval [intervalInMilliseconds=98, value=2]
TimeInterval [intervalInMilliseconds=101, value=3]
TimeInterval [intervalInMilliseconds=502, value=4]
TimeInterval [intervalInMilliseconds=500, value=5]
TimeInterval [intervalInMilliseconds=499, value=6]
TimeInterval [intervalInMilliseconds=102, value=7]
TimeInterval [intervalInMilliseconds=99, value=8]
TimeInterval [intervalInMilliseconds=101, value=9]
As we can see here, our observable will emit 4 values in quick succession, then 3 values in greater intervals and finally 3 values in quick succession. The scan only serves to turn the values into the natural sequence, rather than 3 repetitions of 1,2,3. The reason the first two emissions are simultaneous is that that scan emits the initial value and the first value together.
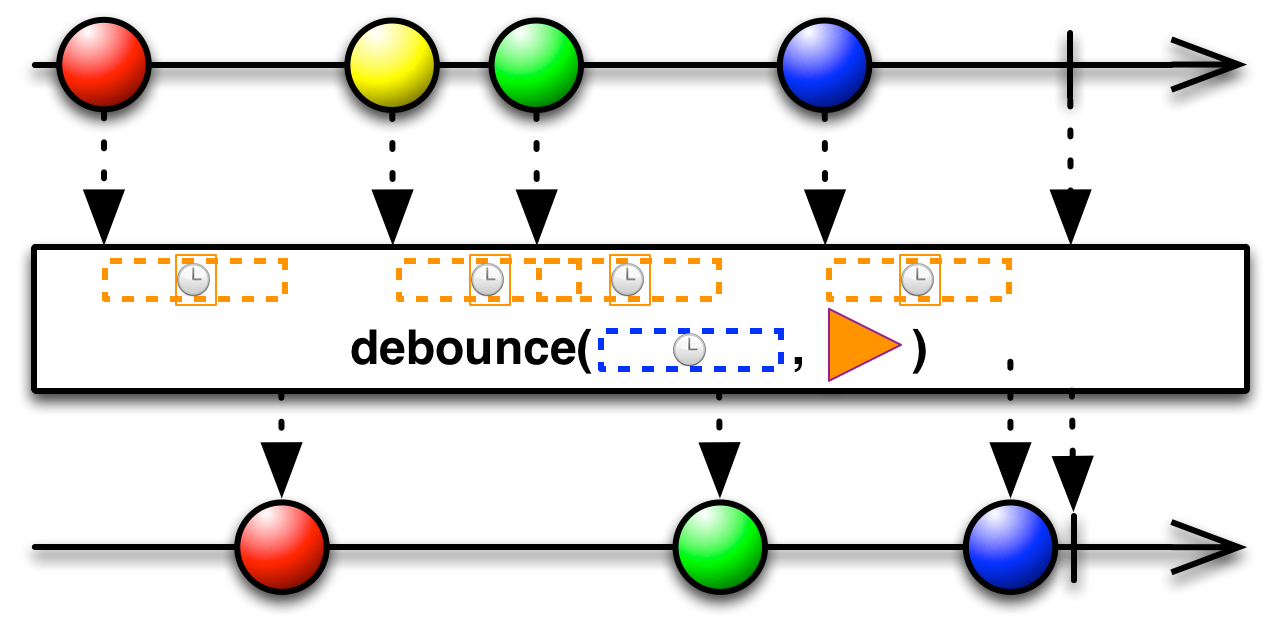
Now that we understand our source observable, let's debounce it:
Observable.concat(
		Observable.interval(100, TimeUnit.MILLISECONDS).take(3),
		Observable.interval(500, TimeUnit.MILLISECONDS).take(3),
		Observable.interval(100, TimeUnit.MILLISECONDS).take(3)
	)
	.scan(0, (acc, v) -> acc+1)
	.debounce(150, TimeUnit.MILLISECONDS)
.subscribe(System.out::println);3
4
5
9
We debounced with a window of 150ms. The bursts of emissions in our observable were faster than that (100ms), so only the last value in each burst passed through. During the slower part of our observable, all the values were accepted, because the 150ms window expired before the next value arrived.
There is a throttleWithTimeout operator which has the same behaviour as the debounce operator that we just saw. One is practically an alias of the other, even though neither is officially declared as such in the documentation.
You can also debounce based on a per item basis. In this case, you provide a function that calculates for each item how long the window should be after it. You signal that the window is using a new observable for each item . When the observable terminates, the window expires.
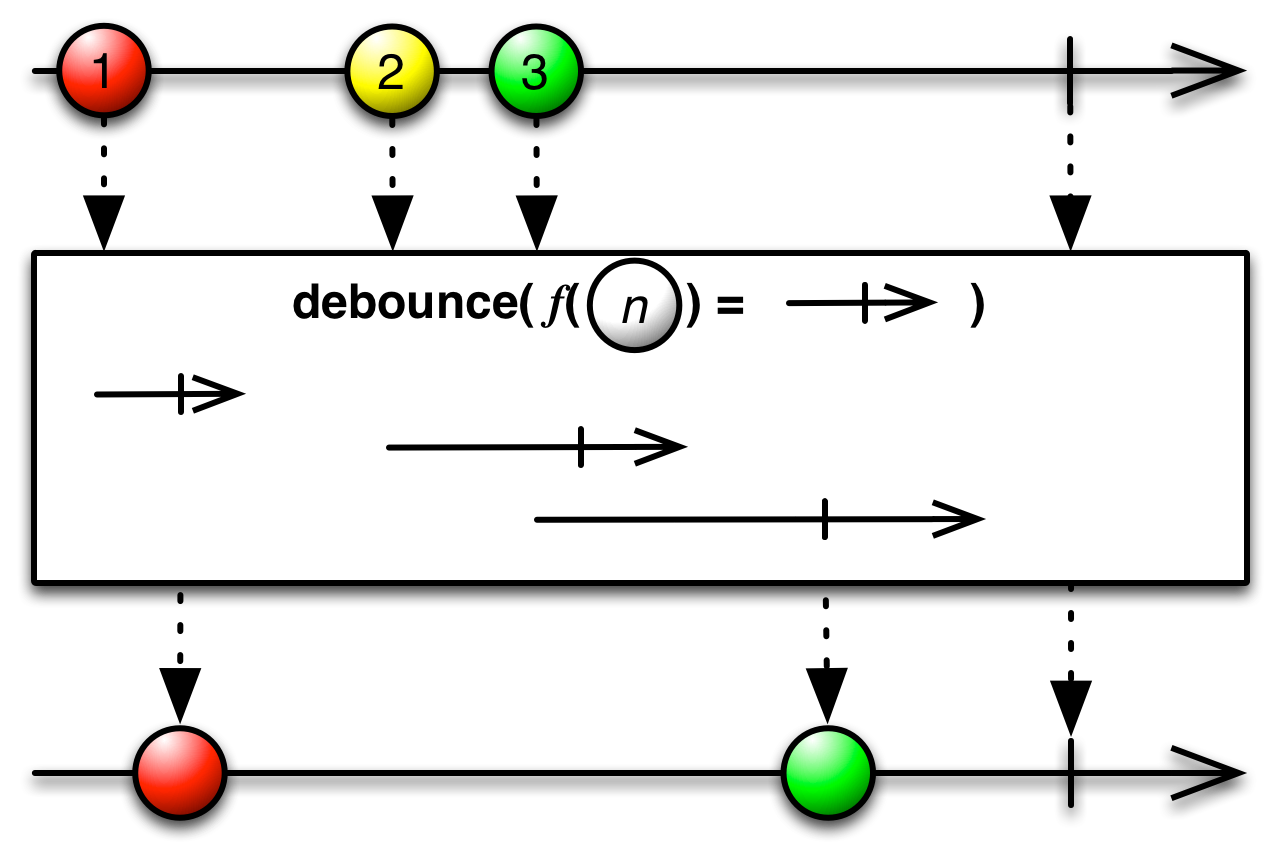
In the next example, the window size for each value i is i*50ms.
Observable.concat(
Observable.interval(100, TimeUnit.MILLISECONDS).take(3),
Observable.interval(500, TimeUnit.MILLISECONDS).take(3),
Observable.interval(100, TimeUnit.MILLISECONDS).take(3)
)
.scan(0, (acc, v) -> acc+1)
.debounce(i -> Observable.timer(i * 50, TimeUnit.MILLISECONDS))
.subscribe(System.out::println);1
3
4
5
9
Let's map each item to the length of its window and the time that the next item actually arrives
| Item | Calculated Window | Time until next value | Window < next value |
|---|---|---|---|
| 0 | 0 | 1 | |
| 1 | 50 | 98 | Yes |
| 2 | 100 | 101 | (timed operations in Java are not 100% accurate) |
| 3 | 150 | 502 | Yes |
| 4 | 200 | 500 | Yes |
| 5 | 250 | 499 | Yes |
| 6 | 300 | 102 | |
| 7 | 350 | 99 | |
| 8 | 400 | 101 | |
| 9 | 450 | Yes |
We can now see why the values turned out to be so.
This operator is useful against observables that undergo periods of uncertainty, where the value changes frequently from one non-definitive state to another. For example, imagine that you are monitoring the contents of a text field and you want to offer suggestions based on what the user is writting. You could recompute your suggestions on every keystroke, but that would be too noisy and too costly. If, instead, you debounce the changes to the text field, you will offer suggestions only when the user has paused or finished typing.
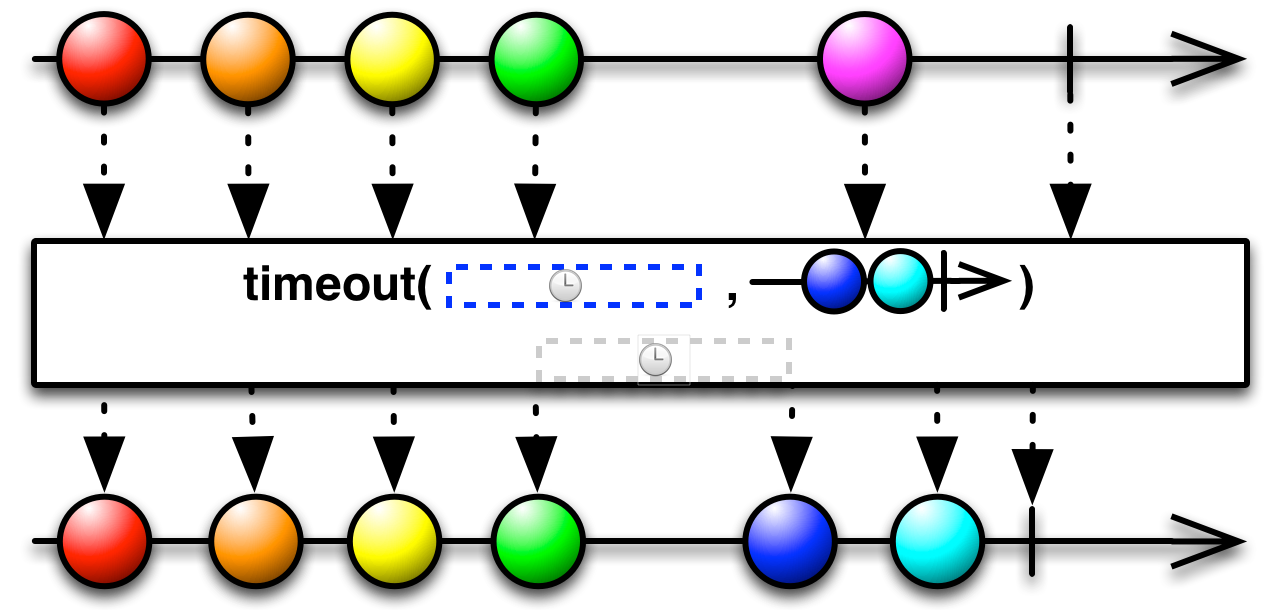
timeout is used to detect observables that have remained inactive for a given amount of time. If a specified amount of time passes without the source emitting any items, timeout makes the observable fail with a TimeoutException.

We will reuse our composite observable from the examples of debounce to demonstrate timeout.
Observable.concat(
		Observable.interval(100, TimeUnit.MILLISECONDS).take(3),
		Observable.interval(500, TimeUnit.MILLISECONDS).take(3),
		Observable.interval(100, TimeUnit.MILLISECONDS).take(3)
	)
	.scan(0, (acc, v) -> acc+1)
	.timeout(200, TimeUnit.MILLISECONDS)
	.subscribe(
		System.out::println,
System.out::println);0
1
2
3
java.util.concurrent.TimeoutException
The output mirrors the source observable for as long as values come more frequently than 200ms. As soon as a value takes more than that to arrive, an error is pushed.
Instead of failing, you can provide a fallback observable. When a timeout occures, the resulting observable will switch to the fallback. The original observable will be ignored from then on, even if it resumes.
Observable.concat(
		Observable.interval(100, TimeUnit.MILLISECONDS).take(3),
		Observable.interval(500, TimeUnit.MILLISECONDS).take(3),
		Observable.interval(100, TimeUnit.MILLISECONDS).take(3)
	)
	.scan(0, (acc, v) -> acc+1)
	.timeout(200, TimeUnit.MILLISECONDS, Observable.just(-1))
	.subscribe(
		System.out::println,
System.out::println);0
1
2
3
-1
You can also specify the timeout window per item. In that case, you provide a function that creates an observable for each value. When the observable terminates, that is the signal for the timeout. If no values had been emitted until that, that triggers the timeout.
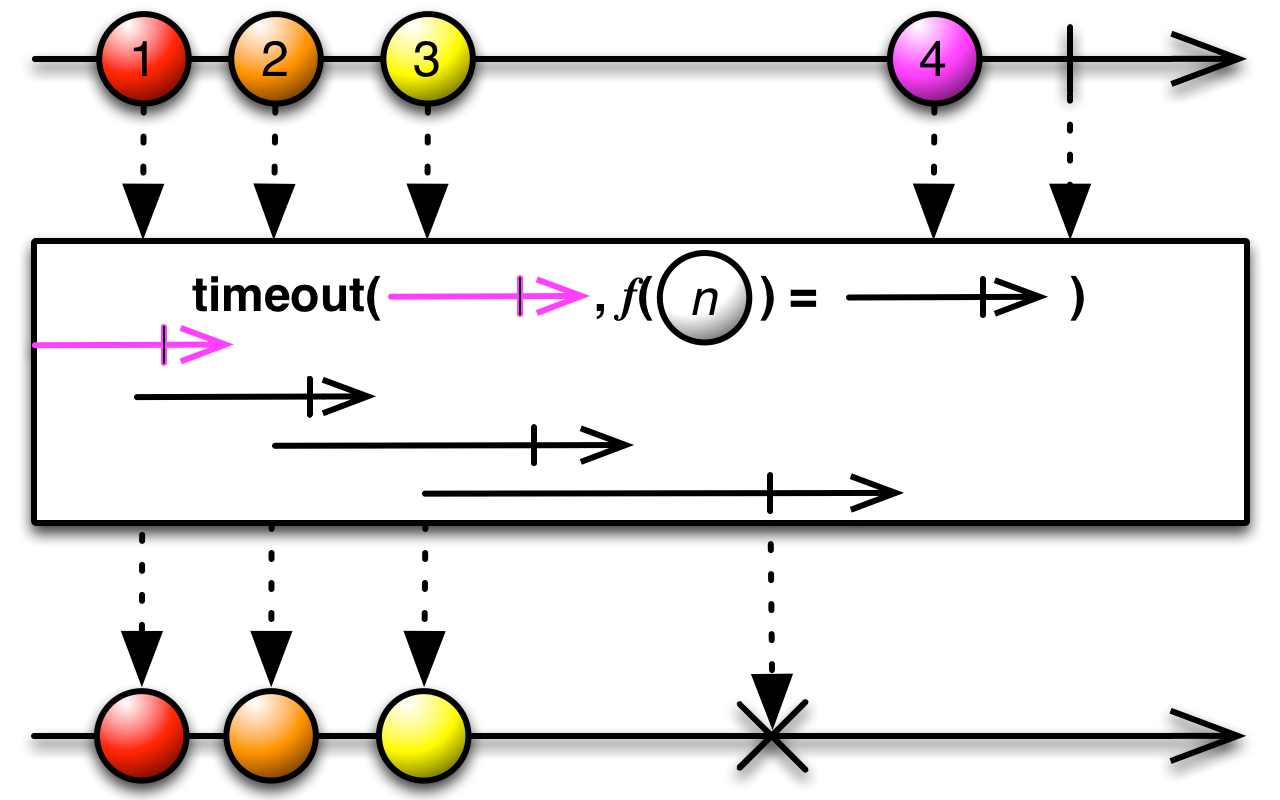
Here is the previous example, implemented using this overload.
Observable.concat(
		Observable.interval(100, TimeUnit.MILLISECONDS).take(3),
		Observable.interval(500, TimeUnit.MILLISECONDS).take(3),
		Observable.interval(100, TimeUnit.MILLISECONDS).take(3)
	)
	.scan(0, (acc, v) -> acc+1)
	.timeout(i -> Observable.timer(200, TimeUnit.MILLISECONDS))
	.subscribe(
		System.out::println,
		System.out::println);
Again, you can provide a fallback observable with
.timeout(i -> Observable.timer(200, TimeUnit.MILLISECONDS), Observable.just(-1))The output is the same as the previous two examples
| Previous | Next |
|---|---|
| Combining sequences | Hot and cold observables |